Saturday, June 19, 2010

summery seventies top


I've made a vow to start using the vintage patterns in my collection to make things that I can wear in everyday life... and if I'm honest with myself, that means I should focus on simple separates vs. dressy dresses.  I usually wouldn't look twice at a pattern from the 70's, but this McCall's top from 1975 seemed so incredibly modern that I thought it would be fun to give it a try.  It also worked out great because I had less than a yard of this cheery vintage floral print, and this is about the only garment that I could find that would make use of such a small piece. 


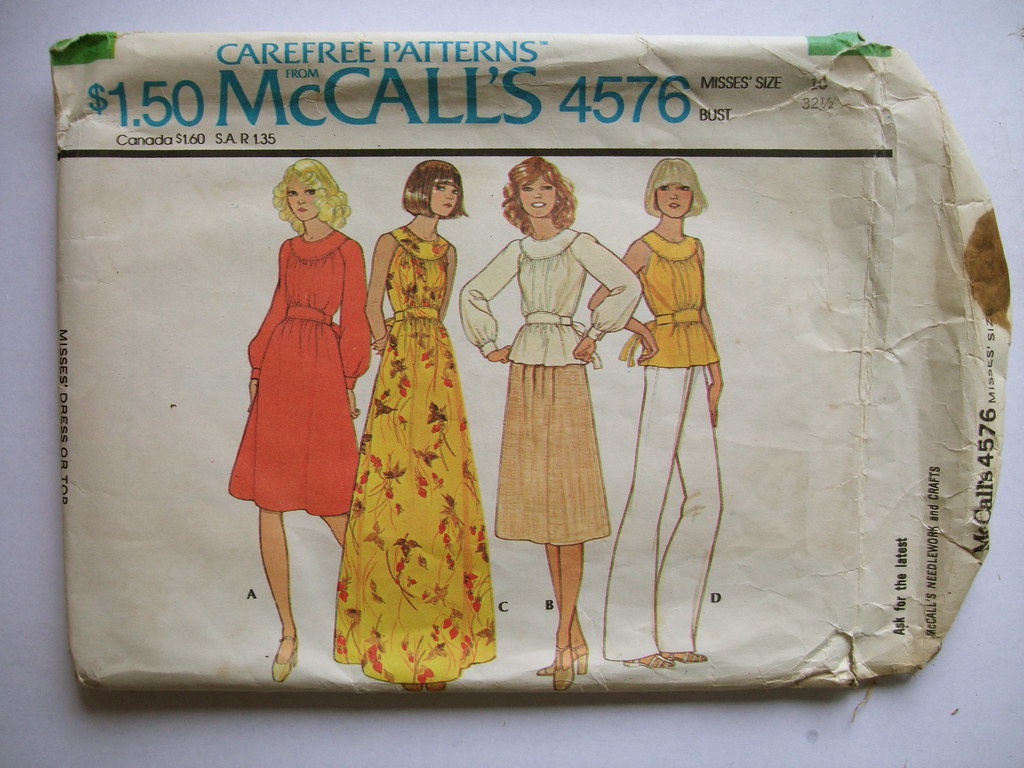
This shirt was super easy to make and only took a few hours to complete.  I think it would especially be cute in the longer length as a dress, so I might have to try another one at some point in the future.  The only change that I made was raising the placement of the belt by an inch or two, which I kind of regret now because it looks like a maternity blouse!  But it is incredibly cool and comfortable, so I'm sure it will get lots of wear around the house this summer.  


Thursday, June 17, 2010

more patterns in the archive

1919 - McCall 9060

I have updated my pattern archive with my children's patterns, and a few other recent purchases.  The pattern you see here is one of my favorites.  I'm dying to make this outfit for my son... and of course, a matching late-1910's costume for myself!

I've also started using some of these patterns for fast and frivolous summer sewing projects, so hopefully I'll have some fun new garments to show you all soon.


Saturday, June 5, 2010

hat decorations

After reshaping my beachcomber hat into a more suitable shape, the last step was just to decorate it.  I looked through some of my books of Edwardian fashion plates and decided to do a cluster of roses on one side with a fabric band that was loosely inspired by the hats from this 1909 Mode Illustree picture.


I am a big believer in hot-glue millinery, so all of the decorations were quickly added just hours before the event started.  I glued strips of silk to the crown first to create the band, then added heirloom-style silk roses that I bought on sale at Michael's.  I filled in the gaps around the flowers with smaller strips and loops of silk.   


front


back

I also made two super-long hat pins by sharpening the ends of some spring steel rods, which you can buy at hobby shops that cater to the model airplane crowd.  Then I just superglued a few glass beads to the other end.

Unfortunately, I didn't look in a mirror when putting my hat on at the suffragette event, so the flowers were too far to the side and back for my taste.  But it still looked great for side-view pictures, and overall, I was very pleased with the way it turned out.  I hope this tutorial gives you a few ideas to help you with your next millinery project!

suffragette recap


I had a wonderful time at the suffragette event last weekend!  We had 12 ladies in attendance (including the wee ones) who were wearing a wonderful range of fashions dating from the early 1900's up to the early 20's.  We did a little shopping at the farmer's market (yay cookies!) and then came back and shared a yummy light picnic lunch.  I really enjoyed chatting with everybody and taking lots of pictures in our beautiful setting.  And I had a blast making the banners and poster and researching some of the writings of the suffragettes.  This was definitely a theme that was right up my alley!  I'll be posting more about my dress and hat this week, but for now, here are my pictures from the event.