Monday, October 28, 2013

the young pirate


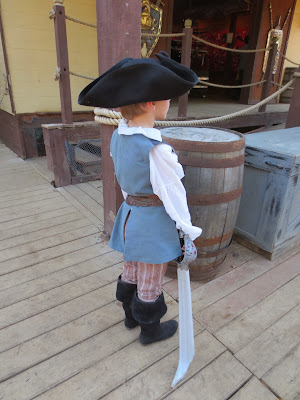
For the All Hallow's Eve weekend of the Texas Renaissance Faire this year, I decided to make my wee boy a pirate costume.  I also thought it would make a great entry for the "masquerade" challenge in the Historical Sew Fortnightly since it is a bit of a fantasy version of 18th c. boys' clothing.   Luckily, he already had a shirt which I had made for the HSF "white" challenge, so all I needed to do was make a waistcoat, breeches, and a few piratey accessories.

The waistcoat is a modified version of the Mill Farm boys waistcoat pattern.  I extended the bottom edge in the front and back to make longer flaps, rounded the neckline, and enlarged the pockets a little more.  I am not very knowledgeable about 18th c. men's waistcoats, so I don't know if it is historically correct to make the back flaps as long as the front (I usually see them cut off shorter than the front), and I couldn't find many back-views of waistcoats from this period.  But I've always thought the cut-off backs were a little odd looking when worn without a jacket, so I decided to make it long all the way around.  The front of the waistcoat is made with blue-grey wool with a very small check, and the back is recycled from a man's linen shirt that I dyed to match.  The whole thing is lined with tan cotton duck to give it a little more body. Although I wanted his outfit to be more of a "real" looking pirate instead of the bright and flashy Halloween pirates that you usually see, I think the silver buttons definitely add a bit of pirate panache as a finishing touch.


His breeches are made from a vintage Halloween pattern from the late 1960's, which made them really fun for me because I love working with vintage patterns.  They ended up fitting him great, and the construction is worlds better than most modern Halloween patterns.  The original pattern does use a zippered fly instead of a buttoned fall-front, but I thought the buttons at the knees were a really nice historical touch.  The pattern actually calls for a buckle on the knee strap too, but I used mother-of-pearl buttons for all of it because I didn't have the right sized buckles in my stash.  The pants are made out of striped linen that was recycled from a pair of my old capris, and I used some checked cotton for the waist and leg facings, which makes me happy even though nobody will ever see it.  All of the materials and buttons for his costume came from my stash and from recycled clothes.


For his accessories, I bought him a pair of cheap girls' boots from Target and added a flap of faux leather at the top to make them look like the bucket-boots that you always see in pirate movies.  His shoes are probably the least historically accurate part of his costume, but they are cute and he has a lot of fun wearing them, so what the heck.

I also took a large-brimmed wool hat blank and wired and bound the edge, then I tacked the brim up into a tricorn shape.  My son's one request was that he have a skull and crossbones on his hat, so I made a rosette out of the selvage edge of some black corduroy (I love how the selvage has a fringed look to it), and then I tacked on a pressed-brass skull that I found on etsy.


We finished it all off with a paisley scarf for his sash, an old belt, and a variety of toy pirate weapons and bags-o-loot.  I'm really happy with the way it all turned out, and I had a wonderful time playing pirates with my boy at faire.  


Tuesday, October 8, 2013

Regency shawl hacks

1803 fashion plate via Scene in the Past
1801 fashion plate via Scene in the Past
I LOVE Regency shawls - especially the decadently long ones that nearly drag on the floor.  Shawls of this type found in museums such as the Met are typically a little over 100" in length, but others from this period could go up to 140" or more.  Unfortunately, it is difficult to find modern shawls that are longer than 70 or 80 inches, and it is also hard to find modern shawls that are simple enough to replicate the look of their Regency counterparts, which usually had a plain ground and designs along the borders only.

So for the Historical Sew Fortnightly "outerwear" challenge, I decided to alter a few inexpensive shawls from ebay to make them more appropriate for Regency costuming.  I found 4 different shawls that have paisley border designs and plain grounds, and they were cheap enough that I could easily buy two and piece them together in the middle to make them longer.

I started by cutting off one of the bordered ends on each of the two shawls (so you don't get a border in the middle of the shawl).  Then I sewed the two cut edges together to make one super-long shawl with a seam in the middle and borders on both ends. I used a flat-felled seam to make it look nice on both sides, and each shawl took me under 30 minutes to complete.  I sewed some of the shawl seams on my sewing machine, while others were hand-stitched.  Out of the four shawls, the one that I think turned out the best was hand-sewn on both sides with a wide 1" overlap in the felled seam.  When I tried to make the seams very small, they were more difficult to work with since the weave is relatively loose and threads have a tendency to pull out when there isn't much selvage remaining to help hold it together.  With the exception of the green shawl, which was shorter than the others to start with, I made all of these between 108" and 115" when pieced together.  

There is, however, one feature of a real Regency shawl that is noticeably different from my "hack" shawls: the ground on historical shawls would be the same color on both sides, and all of my modern shawls have a different color on each side.  But I think that's a pretty nit-picky thing to worry about - especially considering how cheap and easy these are to make.  But if it really bothers you, you could also cut the border designs off of a modern shawl and sew them onto a solid piece of wool fabric.  I found examples of Regency shawls that were pieced together during this period using a similar technique.  

 
Shawl #1: Acrylic/Viscose from the-bestdealmarket
This was the cheapest option that I found at $8.50 per shawl.  It also has the loosest weave and the design had the least amount of detail, but it is very silky and soft, and there is a good range of color choices available.  Not bad for a $17 accessory!

Shawl #2: Cashmere/Silk from thelakegalleria
These shawls are probably the highest quality since they are made of natural materials, and they only cost $9.95 apiece.  The pattern in less bold and they aren't as long as the others, but wow, they feel great.

Shawl #3: Wool (maybe) from aashigifts
I ordered these shawls from India, and they have a nice tight weave and a very detailed border design. The seller claims that they are wool, but there wasn't a fiber content tag on them, and I haven't done a burn test to see if they really are what they claim to be.  These were the most expensive shawls that I bought at $17 apiece, but it's such a pretty garment that I definitely think it is worth the $34 total cost.


Shawl #4: Rayon from jokotkat
This last shawl is another beauty that is sold in multiple colorways.  They cost $12.99 each and are very silky and soft.  I also have the same shawl in a burgundy color, and I am trying to restrain myself from buying a pair of the blue ones too.  The border pattern works so perfectly for Regency.  

Hopefully, this will give you a place to start if you are also in the market for Regency shawls.  If you don't like these options, all of these sellers have other shawls that might work for this period as well.  I was very pleased with my shopping experience with all four sellers, and the shipping was fast and free, which is exactly how I like it!  You can also do your own ebay search using some combination of the words "paisley", Kashmir", "pashmina", "wool", "shawl", or "wrap", which is how I found the shawls that I bought. 

Do you know of any other wonderful Regency-esque shawls that could be modified into a longer garment? If so, let us know in the comments and we can all share our shopping tips!


Monday, October 7, 2013

1790s transitional stays


I've always been curious about the 1790 linen jumps from Jill Salen's Corsets, so I thought that the "wood, metal, bone" challenge for the Historical Sew Fortnightly would be a good excuse to test them out.  My original theory was that they were misdated and actually came from later in the decade, but I was surprised by how low they sat on the body.  After making them up for myself, I think the earlier date is probably correct.  They look like they would work well for the pigeon-breasted look of the early 1790's when the necklines were quite low and the waistlines were starting to creep up.  But I also think they would work for some Empire styles as well - especially when the dresses were in transition and the bust was still more shelf-like vs. rounded, like you see in the fashion plate on the right.

To make these stays work better for both styles of dress, I shortened the shoulder straps by 3 or 4 inches, and I also cut down the back, underarms, and front tabs of the body so that the bustline could be raised to a higher level (the front was not changed at all from the original pattern).  I can always lengthen the ties on the shoulder straps to drop the stays down to where they originally started, and this way I can have the best of both worlds.  In the picture below, you can see the changes that I made to the straps and top edge.


The neckline is cut so low in front that it has almost an underbust effect when laced closed.  I didn't photograph it that way to preserve a bit of modesty, but it's definitely a "cup runneth over" sort of look.  I think a lot of the shaping of the bust will come from the chemise and the gown more than the stays.  A fabulous article about short stays on the blog Kleidung um 1800 shows that the underbust effect was used in other forms of short stays during the Empire period, which makes me feel better about wearing a garment that provides such scant coverage.

My stays are made from heavy linen, and they are entirely hand-sewn with linen thread.  Salen's instructions for making these up seemed to use more modern techniques than would have been used in the 18th c., so I constructed mine using the le point a rabattre sous la main stitch around the edges, and a spaced backstitch at the side seams.  Salen also theorized that these stays would have been boned with metal, but I talked to a few friends who are quite knowledgeable about stays from this period, and they seemed to think that walebone was a much more likely option.  They also encouraged me to try German plastic boning since it seems to be the closest substitute that you can get for real whalebone.  Although I had originally planned on using metal or cane for the boning on these stays, I took their advice and I'm quite pleased with the way they turned out.  I have to admit that it seems a bit ironic that I have no wood, metal, or bone in a garment that was made for the "wood, metal, bone" HSF challenge, but hopefully you all will allow me to bend the rules a little and include other types of boning in the "bone" category.


Tuesday, October 1, 2013

new OLD content

Okay.  So last year I promised to re-web more of the missing Renaissance-period pages from my original website... and yeah... that really hasn't happened.  And a lot of you have asked me about specific articles or costumes over this past year, and I'm really sorry that I haven't been able to help you out.  But please have sympathy on me - it is incredibly tedious and time-consuming work to re-web the old stuff, and I have so little time to work on my own projects as it is that it kills me to put aside fun new projects so that I can re-do work from a decade ago.  This is my hobby, my stress-relief, my fun, and re-webbing old content is decidedly NOT fun.

But, I also feel bad for being so selfish and lazy about my website, so I'm going to take another stab at it this fall.  First on my to-do list was was my late 15th c. Florentine Dress Diary and the 1475-1500 Florentine image gallery that went along with it.  Hopefully I can get a few more pages done before I get swamped with work again this fall.

Oh, and while I am confessing my sins and begging for forgiveness, I wanted to apologize for rarely replying to comments on my blog posts.  I HATE the fact that I can't directly reply to the people who ask questions.  I've tried several times to create threaded responses with Blogger, but I can't get anything to work.  I always feel incredibly awkward posting replies when I don't have time to answer right away - I never know if you are going to come back and see my answer days or weeks later, or if I'm just talking into the void... so I have a bad habit of just not posting anything at all.  You would probably be better off emailing me if you want a reply, but I confess that I'm pretty forgetful about replying to emails too.  *sigh*  I'm a bad, bad, blogger.  But feel free to email me more than once if I don't reply within a few days.  I promise I'm not ignoring anybody on purpose - I'm just forgetful and overwhelmed by my hectic "real-world" life most of the time.

I'll continue to post updates here when more of the old articled have been added, and you can find a complete list of my archived articles, tutorials, and image galleries by clicking the RESEARCH tab at the top of the page.

Thank-you for having so much patience with me!