Showing posts with label 1780s. Show all posts

Friday, May 27, 2016

rewear and refresh

Soooo... it's been 6 months since my last blog post, and I thought I'd drop in and let you all know what I've been up to. I had a big push of productivity last spring and summer, but then I crashed after Costume College and desperately needed some time to hibernate and recuperate. It's been good. I really needed a break from sewing to recharge my batteries a bit. But I haven't stopped going to costume events during this past year - I've just been rewearing older pieces from my wardrobe and giving each outfit a few tweaks to make them feel more fun.


I started off last January by wearing my mourning calico to a exhibition of artwork by Gustave Caillebotte. I took this opportunity to make a new set of white collar and cuffs to finish off the dress. The inner collar and cuffs are items that you almost always see in original Victorian fashion plates and photographs, but as modern costumers, we tend to leave them off - probably because they were separate items and aren't typically included in the display of surviving Victorian garments in museums, so our eyes aren't as accustomed to seeing them there. But 19th century women used the inner collar and cuffs to protect the dress from dirt and body oils, and they could be easily removed and laundered, so it makes sense that they were essential finishing touches during the period. I ran out of time and didn't get to finish my own collar and cuffs for the first wearing of this dress at Costume College, but the dress feels SO much more complete now that I have them.


You can see the difference between the dress with and without the collar/cuffs in these pictures, and I also wore a new bow at the neckline to change things up a bit more. It's a subtle change, but I like it a lot better this way. The cuffs are just rectangular strips of cotton edged with eyelet that I tacked to the inside of the sleeves. The collar came from a mysterious little pattern on page 294 of Fashions of the Gilded Age, Vol. 2. The diagram is not labeled and there's no illustration showing what the pattern piece looks like when made up, but I suspected that it was one of those jaunty winged collars that you see so often during the natural form years. Sure enough - it worked perfectly!  


My next event was a trip to the Cowgirl Museum, so I decided to restyle my Victorian cycling outfit with some new accessories to give it more of an Old West look. This one didn't require any sewing at all, which was a wonderful treat. I just wore a different hat, a bandanna, some leather gloves, and an old belt and pouch with a turquoise brooch in the place of a buckle. I wish I could claim that the holster was mine too, but this piece was just on loan from my friend Christy for this picture.  


I found it amusing that Christy had also restyled one of her old dresses to give it a cowgirl vibe, and we happened to have worn these outfits together at another event 4 years ago. Even when we were supposed to be proper ladies, we still couldn't resist pretending to be outlaws! I guess it just runs in our Texas blood.


Finally, the local costume guild organized an 18th c. dinner party, so I decided to wear my black chemise once again. To change this one up, I wore my big embroidered kerchief, a new purple striped sash, and I rewound my turban with some purplish-grey silk. But most importantly, I styled a new wig that matches my natural haircolor, which was a HUGE improvement! (Good lord! What was I thinking with that crazy blond mess on my head?!)  


I have a bad habit of wanting to make new costumes for EVERY event that I go to, but this year has made me grateful to have some good pieces in my wardrobe that I can rework and rewear in different ways. Plus, I've really enjoyed focusing on the stress-free fun of wearing costumes vs. the often exhausting process of making them. I have to admit that I'm itching to make some new things again, and I've already started one big project that I'll be sharing here soon. But hopefully I'll be able to stay a little more balanced with my work load in the future, and I think this sewing hiatus has taught me to appreciate my older costumes a lot more than I used to.

BTW - if you'd like to see more pics from my recent costumed adventures, feel free to check out my flickr. Even when I'm not blogging, flickr is one place that always stays updated because I like to share my pics with my wonderful friends in the DFWCG. And if you happen to be in the area - come out and join us! We'll be adding a bunch of new events to our calendar over the next week!

Sunday, November 29, 2015

Grandma, the Wolf, and Little Red


The tale of this costume follows a long and meandering path, and to tell its story, I need to go back to the beginning, over a year ago: “Once upon a time, a lowly seamstress heard news of a magical ball in a far off land…”

*ahem* Okay, so maybe that’s a bit too dramatic for a blog post. Let me try that again:   
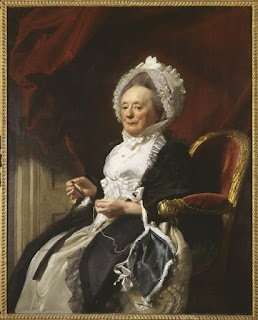
John Singleton Copley, Portrait of a Lady, 1780
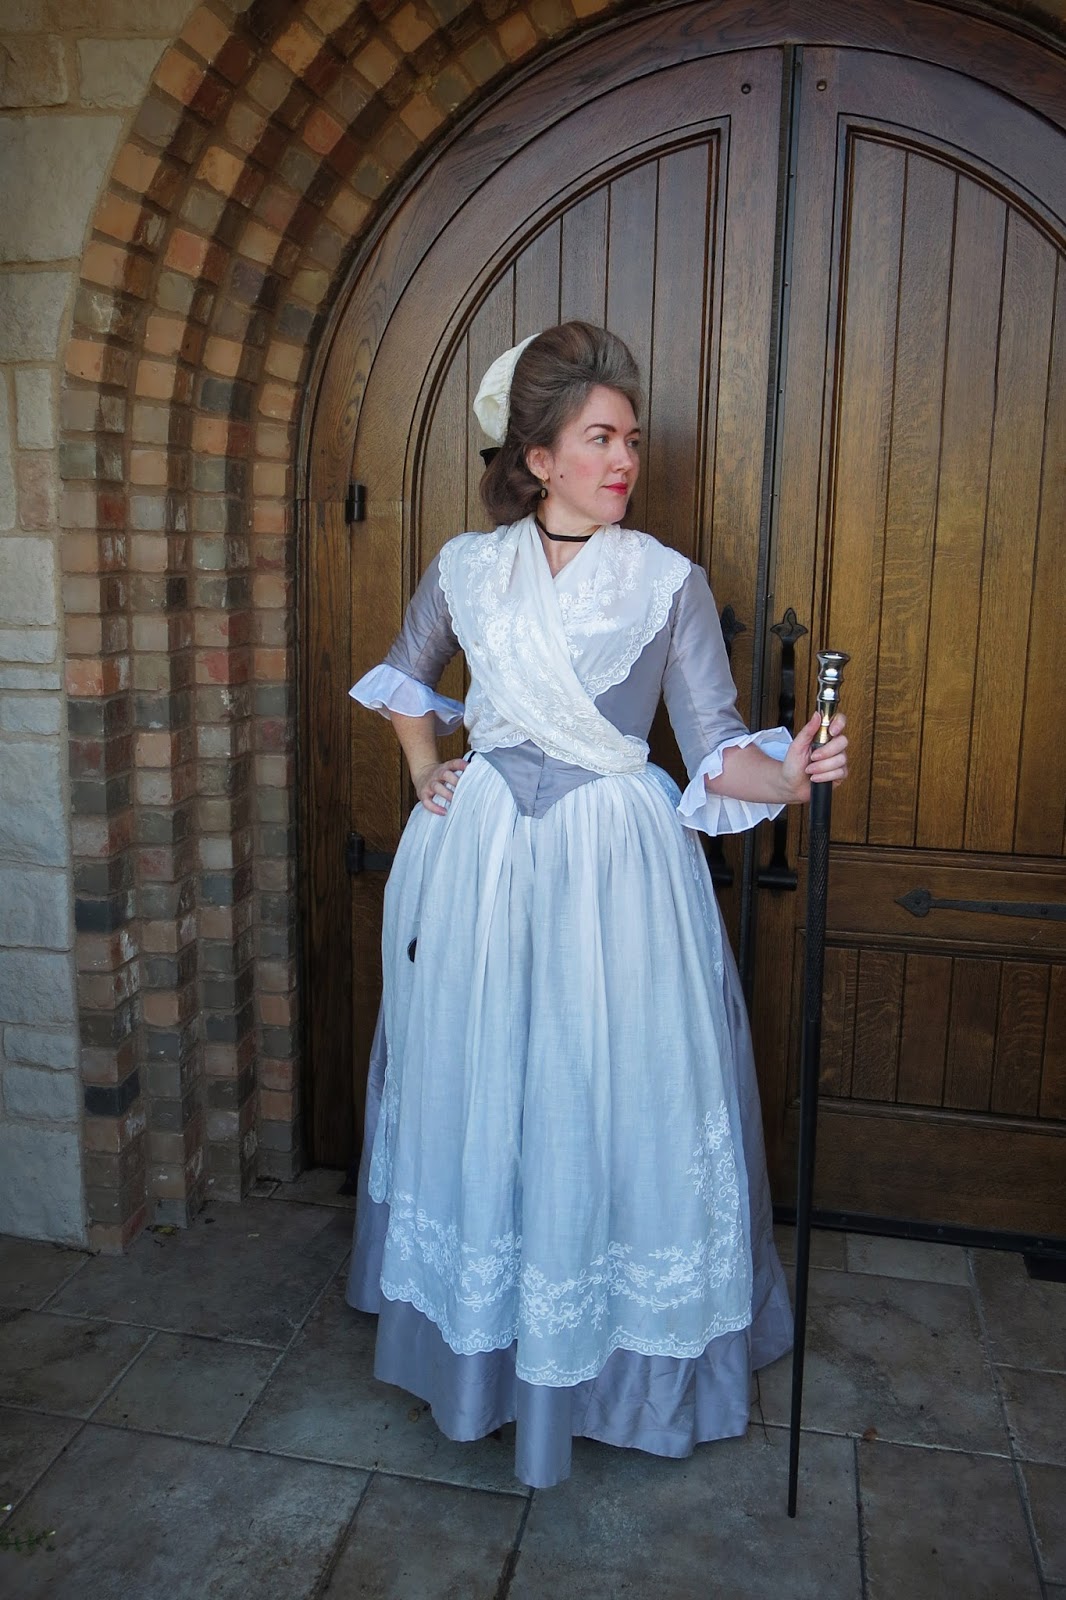
In the summer of 2014, the organizers of Costume College announced that their next theme would be “Plucked from the Pages: Costuming Your Favorite Literary Characters”. I usually have a HORRIBLE time deciding what costumes to make for big events like this one, but I knew almost instantly want I wanted to make for the 2015 Costume College Gala. Out of all the old fairy tales, Little Red Riding Hood is my favorite, so I decided that I would be the Wolf wearing Grandma’s clothing. But I had no intention of being a sweet old grandma wrapped up in blankets with curlers in her hair. I wanted to be an elegant 18th c. grande dame like you see in so many paintings from that age. There is so much subtext and darkness and deeper meaning in old fairy tales, so I started wondering if the real Grandma was meant to be somewhat terrifying and wolf-like on her own, and maybe that’s why Little Red couldn’t tell the two apart. Who knows if that was the original intention, but it’s a fun thought, and one that you could easily imagine being true when you see the countless historical images of stern-looking matriarchs with silver hair and piercing eyes.


I started by collecting pictures of older women in Georgian paintings (check out my Pinterest board for lots of great Grannies). Many of these ladies are shown in grey or taupe gowns with an abundance of frilly white caps, aprons, and fichus, and this color combo already looked very wolf-like to my eyes. For my costume, I decided to make a simple grey silk taffeta round gown, and I drafted my own pattern by modifying and combining several of the dresses in Patterns of Fashion. Although my dress is quite plain on its own, I was lucky enough to find some gorgeous tambour embroidered curtain panels from the 1930’s at an antique show a few years ago, and they worked perfectly for my apron and fichu. The panels all had some staining and damage in various places, but I was able to cut around the bad spots, and I’m thrilled with the way they turned out. To finish off my gown, I made a pair of organdy sleeve ruffles that I just pinned in place. 


Although my dress was fairly simple, I decided that I wanted my hair to be more dramatic for the gala, so I made a large 18th c. wig based on the instructions in Kendra’s Van Cleave’s wonderful book - 18th Century Hair and Wig Styling. I used the instructions for the Lilac wig to build the wire base, and I used a Lioness wig plus several hanks of loose hair to cover the base and make the buckles. The wig was originally dark brown, but I sprayed it with Jerome Russell B Wild Color Spray in Siberian white to make it grey, and this was definitely the best white hair spray that I’ve tried yet. I’ve never worn a wig this big before, but it was lots of fun and surprisingly comfortable. The only unexpected side effect is that it gave me a bit of a face lift from the weight of it pulling backward on my head, which made me look a less matronly than usual. The funny thing is that even though this wig seemed MASSIVE when I was building it, it didn’t seem big at all once I had the whole outfit on. While I was wearing it, I kept thinking, “eh – I could have gone a lot bigger”, and if period painting can be believed, this ‘do was still quite modest compared to many. 

More than anything, 18th century grandmas seemed to love their ridiculous caps, but I wasn’t sure how huge and silly I really wanted to go with mine. What I ended up with was relatively tame compared to what you often see in period paintings and fashion plates, but that’s mainly because I put the cap off for the last minute and didn’t have time to keep hemming ruffles. My cap is made from organdy, and it is just a much larger version of a typical 18th c. cap. It is made from a large oval in back with a band that is wider at the sides and narrower at top, and I covered the band with several rows of box pleated ruffles and some poofed black ribbon. It also has a hanging tail of fabric in the back, which is a common look, even if it doesn’t seem to serve much purpose.   


While I was sewing my gown, I was also working on a wolf mask, which was quite an adventure as well.  I discovered the work of Joni Good and her book, How to Make Masks!. Joni makes some of the most amazing papier mache masks that I’ve ever seen, and you can find much more of her work on her website, Ultimate Papier Mache. I used her techniques and sculpted a mold for my mask using terra cotta clay, then I covered it with shop towels and the plaster/glue mixture that she describes in her book and instructional videos. I actually ended up making two wolf sculptures and papier mache shells because I forgot to use a release agent on the first one, so the paper mache stuck to the clay and wouldn’t come off. Whoops! But it all turned out for the best because I liked my second version of the wolf much better. 

photo by jennylafleur
While I loved making the wolf mask, I have to admit that I didn’t love wearing it. Very few people knew who I was when I arrived at the gala, and it was almost impossible to hear me when I talked because it was so noisy and the mask muffled my words. I also had a limited range of sight, so I had to be very careful not to step on trains or bump into tables. So it was fun for the grand reveal and a few pictures, but poor Wolfie didn’t last long at the party. But the best part about wearing this costume was that my friend Ginger decided to make an 18th c. Little Red costume to go along with my Grandma Wolf, and she made the most AMAZINGLY gorgeous polonaise à coqueluchon, which is a hooded gown that was popular at the time. Recreating the characters of this story in a more historical way was SO incredibly fun, and I was thrilled every time somebody had an “ah-ha!” moment and realized who we were. I’m so happy and grateful that Ginger decided to play along with me, and doing this theme with her was one of the highlights of my trip.


So that’s the story of Grandma and the Wolf, but this tale had one more twist that surprised even me in the end. Although I wasn’t planning on wearing this outfit again so soon, we had an unexpected cold front move in right before our yearly Georgian Picnic, and I decided that a silk round gown would be a little warmer than my semi-sheer cotton chemise dress that I had originally planned on wearing. I still desperately needed a cloak to block the wind, but when I dug though my stash, the only thing suitable that I found was some coat-weight red wool that I found at an estate sale many years ago. So I used the hooded cloak and mantle patterns in Costume Close-Up as a guide, and I quickly threw together a little red mantle to keep me warm at our picnic. So without even planning it, this costume now has become Grandma, the Wolf, and Little Red Riding Hood all in one!


Maurice Quentin de La Tour, 
portrait de Nicole Ricard, enfant, 1748-1750
I trimmed my mantle with strips of pinked, box pleated wool in a style that is very similar to this charming painting of a young girl. I think most winter cloaks were probably lined in the period, but I didn’t bother to do that on mine since the fabric was felted and quite heavy already. My only complaint is that the hood pattern that I used probably dated from the mid-1700s, so it ended up being a bit small for my later 18th c. hairstyle. I’m tempted to take the hood off and try adding a larger one in the future, but I still love my little red riding hood like crazy, and it kept me quite warm and cozy at the event. 

I also wanted to take a minute to thank several of my friends for giving me some of the gorgeous accessories that you can see in these pictures. My mitts, workbag, pinball, and muff were all gifts made by amazingly talented and generous ladies, and I can't tell you how much that I treasure them! So thank-you Kendra, Angela, Stephanie, and Mary - you are all so dear to me!


And as a final epilogue to this story (which I'm afraid has gotten quite long winded!), I also wanted to mention my new market cap and hair experiments. I had no interest in wearing my large wig to a windy outdoor picnic, so I decided that a more simple style of hair with a market hat would be much more appropriate. I bought a market cap pattern from Maggie at Undressed Lady last summer, and I made it up in a few hours last week from some scraps of black taffeta left over from older projects.

I’ve also been dying to try out the pomade and powder that I bought earlier in the year from Abby at Heirloom Haircare, but I had a huge disaster on the morning of the picnic and discovered that I had misplaced my pomade. So after a failed search and a lot of panic and cursing, I finally resorted to wearing my bushy white wig out of desperation. It’s not the right style of hair for my outfit, and it badly needs restyling, but it was better than nothing, so I sucked it up and just made do with my sad backup wig. Unfortunately, the market hat really needs a tall hairstyle to support it, so I was pretty disappointed with the way it looked at this first wearing (my picnic pictures are here if you are curious).

But then as I was cleaning my sewing room two days later, I found my pomade and decided to give it another try. OMG – I am in love! My hair is mid-back length right now and not overly thick, so I wasn’t sure if I would be able to pull off an 18th c. hairstyle without adding in extra pieces. But the pomade and powder thickens up your hair so beautifully, and I was amazed by how well it stayed in place with no need for teasing or hairspray. I started by pinning a rat of loose synthetic hair that was wrapped up in a hair net on the top of my head, then I combed my own hair over the rat and pinned it down in back. Then I made two large buckles and a loop with my remaining hair that was hanging down (I basically just copied Abby’s look shown on her blog). After it was all in place, I re-powdered it to make it more obviously grey, and I hid the parts in back where it was pinned with a cap and a bow. I don’t think I’ve ever had such good luck styling my own hair before, and I’m absolutely amazed that I managed to pull this look off on my first try! And as an added bonus, my market hat suddenly went from “wah, wah, waaaa…” to “WOW!” once I had the right hairstyle to support it.

Since I had such good luck with my practice hairstyle, I decided to get dressed up one more time and finally take some proper pictures of my dress. I didn’t get many that I was happy with at either Costume College or the picnic due to bad lighting and my failed hair, so it was fun to finally come up with some shots that I’m really happy with. Check out my flickr if you want to see more.


"... and they lived happily ever after.  The end!"
Sunday, September 6, 2015

A Summer Chemise


A friend of mine was hosting an 18th c. themed birthday party this weekend, and I decided at the last minute that I wanted a new dress that lightweight enough to be comfortable in our lingering summer heat. It's still in the high 90's here in Texas, so I thought a new chemise gown would be well worth a little detour from my other sewing and blogging plans. I also couldn't resist joining my friends, who were also wearing chemises to the party. I'm such a sucker for a theme!
 
The fabric is a figured cotton with woven stripes and dots, and it was originally brown.  I bleached it and then re-dyed it to be a periwinkle blue-grey color.  I thought the color that I ended up with was a nice match to the hue in this lovely fashion plate from Cabinet des Modes.  I originally wanted to make a ruffled neckline and hem to make my dress match this fashion plate even closer, but I only had around 4 yards of fabric to work with, so I didn't have enough left over for ruffles.  

Although colored chemise gowns during this time period are plentiful, it's hard to find much evidence for cotton chemise gowns in colors other than white.   Most of the surviving examples and period references show that colored chemises were typically made of silk.  But there is one fashion plate that shows a chemise of pink English muslin, and as far as I know, 18th c. muslin was always made of cotton instead of silk, so I'm hoping that little tidbit of evidence is good enough to let me get away with this somewhat unusual material.


I used the same basic pattern that I created for my black chemise a few years ago, but this time I made elbow length sleeves and only had 2 drawstrings on the bodice instead of 3.  Chemise gowns with fitted backs are very easy to construct, and I think they are a lot less fiddly than the kind that are gathered all the way around.  I took a picture while I was getting dressed to give you a peek at the construction.  It's really just a basic round gown with a gathered section attached over the front of the bodice, and this panel is stitched down on to the bodice at the sides and tied in the center with ribbons.

For the party last night, I just wore a simple ribbon and some flowers in my hair since this seems to be a very common look for ladies in portraits from the late 1780's and early 1790's.  But I also loved the way the dress looked with my black tall hat, so I took some photos of both styles while tromping though the woods at my local park today.  Here are a few of my favorite shots, and there are a few more pictures on flickr.


Sunday, April 28, 2013

shoe upcycle

Once again, I am horribly behind on posting this, but here is what I made for the Historical Sew Fortnightly "accessorize" challenge earlier in the month.  I took a pair of ugly suede pumps and repainted and trimmed them to look like some of the stenciled leather shoes from the late 18th c.

I started by looking for design inspiration.  Most of the stenciled shoes during this period are flat or have tiny little heels, but I did find some earlier examples with slightly taller heels that looked more like my shoes.  I also liked that a few of these shoes used gold metallic paint, so I decided to do something similar with mine.


For the painted pattern, I based my design on these shoes with decorative stripes.


My shoes are painted with acrylic paint mixed with a fabric medium. When you paint suede with acrylic paint, the surface gets smoother and looks more like regular leather, which is a nice bonus. After painting the base color, I used painter's tape to help me space the stripes and draw in the little sun shapes.  I used an oil-based paint pen to draw the designs on the shoes.  It took a while to cover the entire surface, but it wasn't very difficult work - just tedious.  I also painted the heels with the gold paint just to add a bit more contrast.

After the painting was finished, I sewed strips of gold colored silk around the edges and added false seams to the sides.  I tried gluing this binding on first, but the glue kept bleeding through my fabric and staining the outside, so I gave up and sewed it all on by hand.  I finished the shoes with a strip of pinked and pleated trim over the vamp.

Here is the "before"

And here is the "after"

I won't lie - this project was a LOT of work, but I'd definitely try these techniques again to make cheap, customized shoes for the 1780's or 90's.  But unfortunately, these particular shoes are too big and refuse to stay on my feet, even with thick insoles and a ton of stuffing in the toes.  I'm not sure if I'll ever wear them to an actual event or not, but at least it was a good learning experience.  

Oh well.  You win some, you lose some!

Sunday, April 21, 2013

Striped mob cap

Last month, I made a late 18th c. mob cap for the Historical Sew Fortnightly Stripes challenge.  It goes along with a pair of painted shoes that I decorated for the HSF Accessories challenge.   I haven't posted anything about either one of these projects because I was waiting for a chance to get dressed up in my blue redingote with my new cap and shoes and take pictures of it all together... but... my brilliant plan isn't working out so well.  My life is so hectic right now that I haven't had the time for a decent photoshoot, so I've finally given up and decided to just do some quick posts about the construction of these projects and save the dress-up posts for the later.


This project was inspired by a beautiful striped cap in an 1787 portrait by Adélaïde Labille-Guiar.  My version is a 28" circle that I gathered around the edges and then bound into a narrow band of gold silk taffeta that is 30" around.  The sheer striped silk fabric was pretty limp at first, so I starched it heavily and lined it with a layer of tulle to give it a little more body.  The opening of the cap is so large that it only works with a hedgehog wig, but after experimenting with a variety of sizes, this is what seemed to work best for me.

I noticed that many of these caps that are illustrated in period artwork also have a falling veil in the back.  I didn't have much fabric left for the veil, so mine is less full that many of the examples that I have seen, but I thought that a little extra decoration in back would still be better than nothing.
I finished off the cap with a pair of blue bows to match my redingote and a spray of yellow feathers to add a bit of contrast.

This was a very fast and easy project.  It was hand-sewn and entirely made from materials in my stash.  I can't wait to wear it - it's huge and silly and fun, and I'm hoping it will give my redingote a very different look for the summer.

For more wonderfully over-the-top mob cap inspiration, check out the Ministry of Silly Hats page by Mode Historique or the Big Cap of DOOM by The Costumer's Closet.  Both of these ladies and their fabulous caps were a huge inspiration for me wanting to make one of my own.

Tuesday, February 26, 2013

a pirate bicorn


The latest Historical sew fortnightly challenge was "embellish".  Since this is a busy time of year for me, I decided to keep things simple and just decorate a hat.  I bought a bunch of wide-brimmed wool hats from Target last year, and I thought these would make a wonderful pirate hats.  All they need is some wire around the edge and a bit of trimming.

Before: floppy and boring...

After: piratey and AWESOME!

I bought the vintage trim that I used around the edges at the Antique Elegance show two weekends ago, but everything else came from my stash.  After I wired and bound the edges, I folded the brim up and stitched the edges together at the sides to keep it in place.  I also added tassels to the ends like you see in some period bicorns, but I chose tassels that were raggedy and worn to make it look more pirate-ish.  I decorated the front with a ribbon cockade made with the wonderful instructions on the blog Idle Hands (part 1 and part 2).  I also added a bunch of feathers to the top based on two 1780's fashion plates from Galerie des modes et costumes français showing women wearing heavily embellished bicorns.


And that's pretty much it!  All of the embellishment was hand-sewn, and it probably only took me 3 hours from start to finish.  Here are a few more pics to show how it looks for other sides.