Showing posts with label pirate. Show all posts

Monday, October 28, 2013

the young pirate


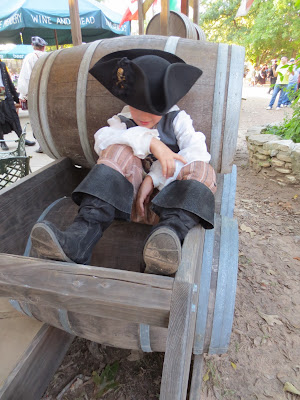
For the All Hallow's Eve weekend of the Texas Renaissance Faire this year, I decided to make my wee boy a pirate costume.  I also thought it would make a great entry for the "masquerade" challenge in the Historical Sew Fortnightly since it is a bit of a fantasy version of 18th c. boys' clothing.   Luckily, he already had a shirt which I had made for the HSF "white" challenge, so all I needed to do was make a waistcoat, breeches, and a few piratey accessories.

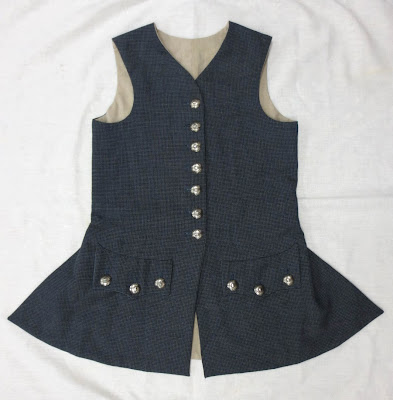
The waistcoat is a modified version of the Mill Farm boys waistcoat pattern.  I extended the bottom edge in the front and back to make longer flaps, rounded the neckline, and enlarged the pockets a little more.  I am not very knowledgeable about 18th c. men's waistcoats, so I don't know if it is historically correct to make the back flaps as long as the front (I usually see them cut off shorter than the front), and I couldn't find many back-views of waistcoats from this period.  But I've always thought the cut-off backs were a little odd looking when worn without a jacket, so I decided to make it long all the way around.  The front of the waistcoat is made with blue-grey wool with a very small check, and the back is recycled from a man's linen shirt that I dyed to match.  The whole thing is lined with tan cotton duck to give it a little more body. Although I wanted his outfit to be more of a "real" looking pirate instead of the bright and flashy Halloween pirates that you usually see, I think the silver buttons definitely add a bit of pirate panache as a finishing touch.
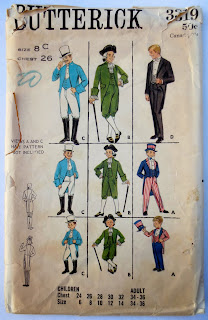
His breeches are made from a vintage Halloween pattern from the late 1960's, which made them really fun for me because I love working with vintage patterns.  They ended up fitting him great, and the construction is worlds better than most modern Halloween patterns.  The original pattern does use a zippered fly instead of a buttoned fall-front, but I thought the buttons at the knees were a really nice historical touch.  The pattern actually calls for a buckle on the knee strap too, but I used mother-of-pearl buttons for all of it because I didn't have the right sized buckles in my stash.  The pants are made out of striped linen that was recycled from a pair of my old capris, and I used some checked cotton for the waist and leg facings, which makes me happy even though nobody will ever see it.  All of the materials and buttons for his costume came from my stash and from recycled clothes.


For his accessories, I bought him a pair of cheap girls' boots from Target and added a flap of faux leather at the top to make them look like the bucket-boots that you always see in pirate movies.  His shoes are probably the least historically accurate part of his costume, but they are cute and he has a lot of fun wearing them, so what the heck.

I also took a large-brimmed wool hat blank and wired and bound the edge, then I tacked the brim up into a tricorn shape.  My son's one request was that he have a skull and crossbones on his hat, so I made a rosette out of the selvage edge of some black corduroy (I love how the selvage has a fringed look to it), and then I tacked on a pressed-brass skull that I found on etsy.


We finished it all off with a paisley scarf for his sash, an old belt, and a variety of toy pirate weapons and bags-o-loot.  I'm really happy with the way it all turned out, and I had a wonderful time playing pirates with my boy at faire.  


Sunday, April 14, 2013

first voyage of the pirate costume


Although I'm moving at a snail's pace on this costume, I finished one more piece of my new pirate outfit - the waistcoat - and was able to wear it to Scarborough Faire this past weekend.

My ultimate goal is to also make a jacket to wear over the this under-bodice.  My plan for the waistcoat and jacket is inspired by these two amazing waistcoat/jacket combos from around 1790.


Although most 18th c. women's waistcoats like this one would probably have a plain linen back and lacing to make it adjustable, I decided to use the wool fabric for the back so it would look more complete on its own.  While the long-sleeved jacket will make quite a dandy pirate look, it might not be the most comfortable thing to wear at blazing hot Texas faires.  It'll be nice to have the option of wearing this outfit either way depending on the weather.


The wool is a very fine grey and black stripe, and the bodice is lined with soft cotton canvas.  I used hook and eyes up the center front, and the cording and silver metal buttons on the front are mostly just decorative.  I used a combination of modern and period sewing techniques while making this bodice, but I made sure to include some visible topstitching with unbleached linen thread to give it a little more of a rustic look.


Like the hat and the petticoat, I made this project as a Historical Sew Fortnightly entry.  This one is for the "By the Sea" challenge, and I had so much fun posing by the pirate ship at the Renaissance festival to fit the nautical theme.  At some point, I still need to do some more distressing on the waistcoat and my under-petticoat.  Compared to the hat and the floral petticoat, these other garments look a little too perfect and new.  But other than that, I'm really happy with the way this outfit is coming along, and I can't wait to start working on the jacket so I can call it 100% finished!  


Tuesday, February 26, 2013

a pirate bicorn


The latest Historical sew fortnightly challenge was "embellish".  Since this is a busy time of year for me, I decided to keep things simple and just decorate a hat.  I bought a bunch of wide-brimmed wool hats from Target last year, and I thought these would make a wonderful pirate hats.  All they need is some wire around the edge and a bit of trimming.

Before: floppy and boring...

After: piratey and AWESOME!

I bought the vintage trim that I used around the edges at the Antique Elegance show two weekends ago, but everything else came from my stash.  After I wired and bound the edges, I folded the brim up and stitched the edges together at the sides to keep it in place.  I also added tassels to the ends like you see in some period bicorns, but I chose tassels that were raggedy and worn to make it look more pirate-ish.  I decorated the front with a ribbon cockade made with the wonderful instructions on the blog Idle Hands (part 1 and part 2).  I also added a bunch of feathers to the top based on two 1780's fashion plates from Galerie des modes et costumes français showing women wearing heavily embellished bicorns.


And that's pretty much it!  All of the embellishment was hand-sewn, and it probably only took me 3 hours from start to finish.  Here are a few more pics to show how it looks for other sides.


Sunday, January 27, 2013

Pirate UFO


For this week's Historical Sew Fortnightly challenge, we were supposed to complete a "unfinished object".  I have a number of UFO's in my sewing bin, but the project that I most wanted to finish was a pirate costume that I started six years ago.  I was originally making this to wear to the a Pirates of the Caribbean premiere, and I was SO in love with my design concept, but then I got pregnant and this project was placed on hold due to my growing belly.  But every year or two, I start thinking about how much fun it would be to wear a pirate costume to faire.  I've dragged it out several times over the years and made attempts to work on it some more, but unfortunately, I never can seem to make much headway.

And once again, life has thrown up roadblocks on this project, and I didn't get as far as I had hoped.  But I did finish the petticoat, so that's better than nothing.  I keep reminding myself that this is an unfinished OBJECT challenge, not an unfinished OUTFIT challenge, so I'm counting this as a minor victory anyway.


The petticoat is made out of some machine embroidered voile that I bought on clearance for next to nothing.  It's not authentic, but I thought it was reminiscent of the beautiful embroidered petticoats from the 18th c.  The construction is based on petticoats like the ones covered in this tutorial.  The only thing creative about this whole project is that I spent a lot of time distressing it so that it looks worn and old.  I dyed and splattered the hem with a mixture of brown and dark green dye.  Then I ripped holes all along the bottom and tried to fray the bottom edge.  I also stitched up some of the rips with some hand-spun yarn, and I added a few patches here and there with scraps of striped fabric.


I'm going to continue working on the jacket over the next few weeks, and I hope to have the whole outfit done in time  for the embellish challenge.  I've changed up the jacket design quite a bit from my original sketch - the big frockcoat looked great in the drawing, but when it started coming together, I discovered it was much less flattering in real life.  I'm still not 100% sure what the jacket will look like when I'm done, but hopefully I'll figure something out this month.