

To begin, I made a mockup out of paper. I traced around a slightly flared plastic pot for the crown, and I made a cone with a flare that I liked for the brim, then measured out from the middle point to draw the inside and outside edges of the brim. I also cut out a circle for the top of the crown, but I didn't even need it in the end.

Next, I took the paper brim template, wet the braid, and then started pinning it directly to the paper. I made each row of the braid overlap the top half of the previous row, and I used the zig-zag designs in the braid to keep it somewhat even. I think most people start with the top of braid hats and work their way down instead of working up, but I wasn't sure how far my braid would go, so I figured it would be better to make the hat shorter if I needed to vs. not having enough for the brim.

After the entire brim section was pinned plus a little extra starting up the crown, I started hand-sewing the rows together using strong, golden-yellow thread that is used for jeans. I used basic basting stitches in the middle of the braid, and I would remove one pin at a time from the paper and move the template out of the way for the part I was working on so I could sew the braid without catching the paper.

After the brim was all basted together, I put the crown template into the opening, and started pinning the braid to that section.

Once the sides of the crown were all basted together, I removed the paper template, and then started folding the top row to the inside to make the flat section at the top of the hat.

To make the braid lay flat while working in toward the center, I had to pinch little tucks in the inside part of the braid and then sew these tucks down. On the right of the picture above, you can see what it looks like with the tucks, and on the left side you can see how the braid tends to poke up without them.

When the hat was basted together, I re-wet it, then turned the entire thing inside out. I sewed the flat edge of the rows to the layer beneath with tighter whipstitches to hold it all together better. In the picture above, I have the top of the crown and the top few rows sewn down. I think you can see how it looks tighter and more solid than the bottom parts.

When I was done, I flipped the hat right-side-out, and it looked like this. It was still wet at this point, so I pinned the back of the brim up and let it dry upside down so the brim could flare out more naturally in the front (you can see that it gets very flat when sitting on the table).

When it was dry, I removed the pins from the back, and it held its shape with no problem. Then I sewed on a simple ribbon band with a few loops on each side of the head. I also went back and tacked down the scalloped edge of the braid around the top of the crown to soften the edge and keep the pointy bits from sticking out so much.
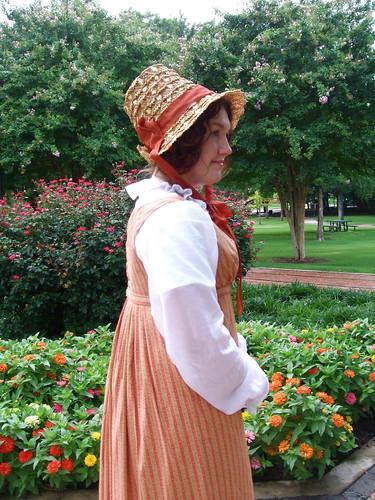
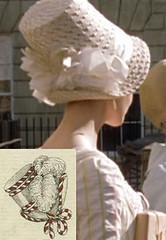
And here you can see the finished product with my new Regency dress!
I considered sewing the braid to a buckram and wired base, but I liked how light and open and airy the braid looked on its own. The hat is pretty flexible still, but it holds its shape wonderfully and is very cool and comfortable to wear. And just FYI, I ended up using about 9 yards of braid when I was done.
Of course, finding vintage straw braid like this was a HUGE stroke of luck, and I doubt that I'll ever find anything quite like it again. I looked around online a little to see if anybody sold wide, decorative straw braid, but I didn't come up with much. It is possible that you could take apart another hat though and reuse the braid if you like the "rustic" look of this type of open braid. About halfway down this page, you can see a natural open weave hat that might give you a somewhat similar look, or you could always use the more common solid braids too.
All in all, it was a very fun and surprisingly easy project. I hope this little tutorial will inspire others to give straw braid millinery a try!


18 comments:
What a great tutorial! And the bonnet is lovely.
Thank you.
Wow Jen! This is a great tutorial, and putting it together seemed to come naturally for you! What a beautiful result!
Funny, I was looking for a similiar straw braid online last week and didn't find much either.
You hat is the best part of your outfit I think, it feels so real rather then costume!
The entire outfit looks wonderful; beautifully period and perfectly accessorized! You should be proud of it.
That hat is *awe-some*! I've tried making a straw hat before out of taken-apart straw hats from the craft store, and, well, yours looks SO professional! Way to go! LOVE the braid you used. So period looking! Bravo!
Fabulous bonnet! We often forget that everyday women had the sewing skills to make these things and that they are simple in their basic construction elements. The materials make such a difference, that's for sure. I think the braid makes it a lot easier to build the correct bonnet shape than trying to wet and mold straw from scratch.
That was a wonderful tutorial and your hat turned out beautifully! You inspire to try new things and they work so well. Thanks for sharing!
Very cool - we're studying the 19th century in history this year and my girls will probably be making costumes for a year end celebration in the Spring - I will definitely be back to visit and see what other goodies you have here!
That was AMAZING!!! I'm in awe of that bonnet! You are very creative and I can't wait to see other projects you are working on.
ohhh this's amazing!! im soooooo gonna do this!! thank u for the tips!! :D xx
Ms. Thompson...Just found this via google. Wonderful! I am in the midst of creating a wardrobe for Bath, England in 2014 for the Jane Austen Festival and looking for hats/bonnets that have a sophisticated look - yours is fab. I realize you did this way back in 2010 but I appreciate your sharing this information. Cheers
Hello, JEN THOMPSON,
From this straw ribbon - left you unnecessary piece?
Is it possible to send me 20 centimeters?
That’s such an impressive breakdown of how to build a straw braid bonnet — craftsmanship and attention to detail really stand out here. Similarly, Dubai property experts brings that same level of precision and dedication to the world of real estate in Dubai, ensuring every client finds a perfect fit. Just like creating a beautiful bonnet requires patience and skill, investing in the right property demands expert guidance and trust.
This thread about crafting a straw braid bonnet really highlights how attention to detail makes all the difference. Having accurate location-based tools like FreeIPAPI can actually help crafters source region-specific materials or follow tutorials that suit local conditions. Small touches like this make projects feel more connected and precise.
Loved how the thread digs into durability and smart material choices, especially when things are exposed to heat, pressure, and long hours of use. That same focus on build quality is what makes Orca Coolers stand out for outdoor setups where performance actually matters. Whether it’s traditional craftsmanship or modern gear, longevity always comes down to using the right materials the right way.
Finding the right Fit is just as important in comfort and style as it is in craftsmanship. Just like building a straw braid bonnet carefully balances size and structure, understanding your true measurements can make a noticeable difference in how things sit and feel. Resources like this guide on bra sizing can help ensure everything aligns perfectly for a comfortable, confident fit.
There is something really satisfying about making your own straw braid bonnet and paying attention to the small details that give it character. Projects like this highlight how much thought goes into materials and craftsmanship, which is why I also appreciate brands that focus on quality and design in everyday items, like https://paravelco.com/. Whether it is handmade millinery or well crafted travel pieces, the care behind the process always shows in the final result.
Some traditional crafts like straw braiding have such a timeless charm, much like the simple yet addictive appeal of a Juego arcade clásico. Both take you back to a hands-on, engaging experience that’s hard to replicate digitally. It’s fun to see how old-school hobbies and games still capture attention across generations.
Post a Comment