Showing posts with label 1910's. Show all posts

Saturday, August 15, 2015

1920 Bathing Suit


I’ve been madly sewing for Costume College over the past few months, and I finally have enough free time again to blog about my projects and show you all what I’ve been up to lately.  
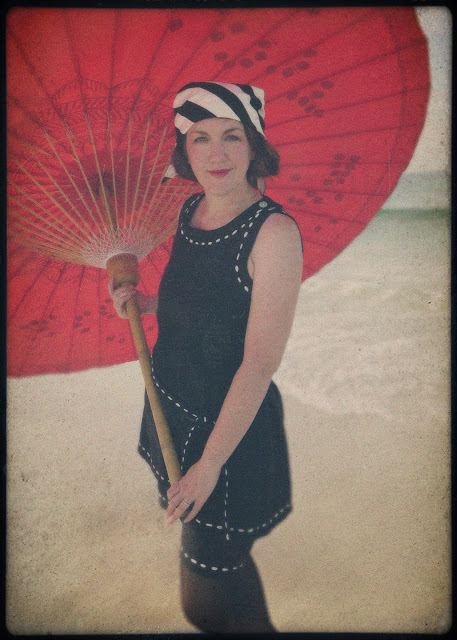
I’ll start by sharing the most summery of my new outfits – a late 1910’s/early 1920’s bathing suit.  I think these bathing suits tend to look pretty silly to our modern eyes, but they are comfy and fun and so easy to make, and I thought it would make a great low-stress costume to wear to the Costume College pool party after a long day of traveling.

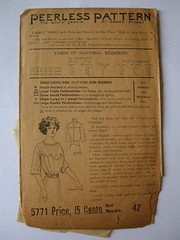
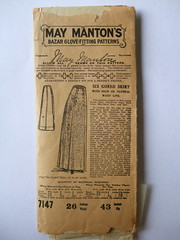
bathing suits from 1918 New Idea Quarterly
My suit is not an exact copy of any one historical outfit, but the basic long tank top and boxy shorts were hugely popular in both photos and fashion plates of women (and men!) from the years around 1920.  You can see a wide variety of similar styles on my historical bathing suit Pinterest board.  Black was one of the most popular colors for bathing suits, and like most of the surviving examples, I made mine from wool.  I had a hard time finding wool knit for an affordable price, but I lucked upon some wool mommie cloth, which has a slightly stretchy crepe-like weave that worked perfectly for my project.  Then I decorated the edges with white rayon soutache.  I threaded the soutache onto a large eye tapestry needle, then sewed it directly into the fabric by using a big running stich around the edges.  The weave was loose enough that the soutache slipped through holes in the cloth with no trouble at all.  You can see a similar treatment on bathing suits like this one

I drafted my own pattern for this suit after consulting several 1920’s swimsuit pattern diagrams in the book Women's Wear of the 1920's: With Complete Patterns. I was very doubtful that the shorts pattern from that book would work for me - it’s just one rectangle for the front, one rectangle for the back, and a square gusset inserted into a slit for the inner legs and crotch - but it actually worked quite well.  Many of the 20’s bathing suits had the shorts attached to the top, but I made mine separate and used elastic at the waistline just to make it less fussy. Or if you wanted an even easier alternative, this type of suit would also be very easy to fake with a modern sleeveless blouse and shorts pattern.  


These early bathing suits are pretty plain on their own, so accessories go a long way to creating a more historical look.  The vast majority of women in 1910’s and 20’s photos of bathing suits are wearing some sort of cloth cap or bandana to cover their hair, so I just hemmed a large triangle of striped cotton to wear for my own beachy headwear.  

I also loved that so many of the women in the earlier photos were wearing black tights with their bathing suits, so I took some photos both with and without the tights, but I think I like the look of tights better just because it is more "old timey" looking. I was also curious to see how it felt to wear hosery on a beach or in water, but it was really pretty nice.  They offered protection from the itchy sand, and having wet tights next to my skin kept me much cooler than having the sun on my bare legs.  But it was also fun to take the tights off and get a more modern, later 20's look.  After having the tights on first, I have to admit that bare legs felt quite scandalous!  

For my beach shoes, I stitched some soutache around the edges of a pair of cheap ballet flats from Target and added some ties to wrap around my legs.  It was an easy alteration, and they held up well to wading through the water.  

But my favorite accessory of all was my parasol. The big one in my beach photos is made of canvas and bamboo, and it was sold at World Market a few years ago.  It is HUGE and heavy, but I loved how similar it looks to the beach umbrellas seen in some period photos, like this famous image by Jacque Henri Lartigue. I tried to take some similar photos, but it was harder than I thought it would be to look glamorous while running back and forth to take pictures with a tripod and automatic timer in the soft sand.  My umbrella kept rolling away and the waves would catch me off guard, so I'm sure I made quite a curious and memorable sight for the tourists watching me from their balconies at the condo!  


I obviously couldn't carry such a huge umbrella around Costume College, so I painted some swallowtails on a cheap paper parasol in a design similar to the parasol in this fashion plate.  It's not nearly as exciting as my big umbrella, but it definitely helped my outfit feel more complete.  The black and white is pretty severe without a little dash of color.  

So that's pretty much it for my first new Costume College costume.  I've uploaded all of my pictures from the weekend to this flickr album if you want to see some spoilers about what I'll be blogging about over the next month, and I also have another album with a few more of my beach pics. I also had fun indulging in my other hobby and turning some of my favorite shots into faux-autochromes and other antique photo fakes.  I think my favorite part about Edwardian and 1920s costuming is getting to Photoshop all the pictures when I'm done!  Autochromes are the best, and I always love getting new inspiration by looking at the real ones - aren't they gorgeous?


Monday, December 9, 2013

knickerbockers


The project that I made for the Historical Sew Fortnightly "one meter" challenge is a pair of 1910's knickerbockers for my son.  I only needed 3/4 of a yard of wide wale corduroy from my stash to construct them, and I was happy to have an excuse to try out another one of my Edwardian patterns.  As usual, it was both a delight to get to work with a pattern that is around 100 years old, but also a source of much befuddlement trying to figure out how to put them together!


I started these last month and intended to use them for the previous HSF challenge, but I ended up having to make them three times before I got it right so they got bumped back a little.  The first time they were clownishly big, even though the size should have been perfect for him.  Next I tried a different Edwardian pattern for knickerbockers that also should have fit him, but they were a little too tight and way too short.  So then I switched back to the first pattern, but I removed about 4 inches of width while keeping the length the same.  So I guess issues with too much ease isn't just a modern problem!

The pattern has "instructions" - and yes, Edwardian instructions definitely deserve air quotes around them! - for a version with a fly and a version with side buttons.  I tried the fly first, but I had no clue what I was doing and it looked pretty wonky, so I switched back to the side opening, but this caused even more confusion when I tried to insert the pockets.  They didn't bother to include a pattern piece for the pocket, and here are all the instructions that were included:

Seems easy enough, but I had no clue what to do with the top of the pocket since it needed to be left open somehow to make the side closure work.  It was probably totally obvious to Edwardian seamstresses, but I'm pretty sure I did it in the most convoluted way humanly possible.  I finally ended up with something wearable in the end, so I guess that's all that matters.

Ironically, the event that I made these for was canceled due to a nasty ice-storm, so I'm not sure if he'll have a chance to wear them before he grows and changes size again.   But it was still fun to try the pattern if nothing else, and hopefully it'll go much more smoothly if he ever needs knickers again in the future.


Tuesday, August 13, 2013

1910's seperates

This week's Historical Sew Fortnightly challenge was "separates", so I decided to make up one of my antique 1910's patterns that I bought this summer.  It is a very basic 7-gore skirt, and I'm guessing that it is from the very early 1910's.  As is often the case with patterns from this period, it actually turned out to be more A-line than the pattern drawing leads you to believe.  I made it from some wool houndstooth from my stash in green and black, and my original intention was to make a jacket to go with it later this fall.  It went together really quickly over the weekend, so that was nice since I was pretty exhausted from CoCo, and I was looking for a project that didn't require much effort.

But unfortunately, I'm not in love with the final skirt.  There's some odd puckering along a few seams that refuses to iron out, and even though I sized it down twice, it is still too roomy over the hips, which you can't really see in this picture, but it is more obvious in life.  Also, I was hoping for a skirt with straighter lines so it would have a more "modern" 1910's look.  This flared shape is a bit old-fashioned for the jacket I had picked out, so there's a pretty good chance that this will be the one and only wearing of this skirt.  I think I'll take it apart and try again with a different pattern when I get around to making the jacket.

Oh well.  You win some, you lose some.

Sunday, January 13, 2013

a dress for the Titanic


I was so thrilled to discover that he next challenge for the Historical Sew Fortnightly corresponded perfectly with the DFWCG trip to the Titanic Artifacts exhibit at the Ft. Worth Museum of Science and History.  So my entry to the centennial challenge is a complete 1913 outfit based on this reproduction dress pattern from Past Patterns, which is listed for the years 1911-1914.

I enjoyed working with this pattern, and I am very pleased with the way the dress turned out.  One of my friends recently asked me if I would recommend this pattern to others, and I would have to answer that with a conditional yes.  If you are comfortable making a dress with no instructions, you are good at resizing, and you just want some basic pattern shapes to get you started, then this is a really nice authentic historical pattern.  I love the shape of the skirts, and there are very few pieces in this dress, so it goes together quite quickly.  There were a few odd areas, like the fact that the bodice is HUGE!  I had to take 4" out of the circumference of the bodice, and took another 3" off the length.  The skirt runs a little short too, so if you are tall, you'll want to add quite a bit to the hem. The only other major change that I made was substituting a shawl collar for the ruffled one just to make it more tailored looking.  But other than those small alterations, I thought the pattern came together very well.

But... and this is a pretty big "but"... there are NO helpful instructions on this thing at all, and you need to be somewhat familiar with 1910's construction methods or you will be completely lost.  It took me 2 days of head-scratching and theorizing to figure out how to close the dress, and I'm still not sure I did it correctly.  I finally went with a center-back closure with snaps that opened from mid-back to the hips, because that is the only way you could have the collar connect across the back (unless there is a split in the collar, which would just be weird).

Also, it helps to know that 1910's dresses often used lapped and top-stitched seams, and the center-front panel of the skirt and the lower sleeves on this dress are both joined this way.  The edge of one piece gets folded under and ironed, then you place it over the next piece and stitch them together from the top, which makes a decorative flap of fabric that looks like a tuck.  It's a fun little detail, but I only knew to do it like this thanks to another antique 1910's pattern that I made up that had much better instructions.   Anyway, if you decide to give this pattern a try, these are the two best tips that I can give you, and hopefully the rest is more straightforward.


My favorite part of this project was making the hat.  I wish I could show or tell you more about how I reshaped it, but I didn't take any in-progress photos because it looked like a such complete hot mess until the very last minute that I was convinced that it was going to be a failure.  But mostly, I just wet the hat and then kept stretching and ironing and re-steaming it over my generic hat block until I eventually bent it to my will.  I was too lazy to go by gelatin to make proper sizing for it, so once it was shaped and dried, I painted a few coats of fabric stiffener on it, and that worked great too.  I love these mid-teens hats that are more vertical vs. the wide-brimmed variety that you more typically see from the early 1910's, so I had a blast making this one. I totally love the weird asymmetry and crazy plumes shooting off in odd directions (here's a great collection of examples). Although the dress could pass for a wide variety of years in the early 'teens, the hat style is very 1913, so I thought it would be a nice finishing touch for the SHF challenge.

This was a 100% stash project, which was fun and very satisfying.  I only spent $1 on a bit of interfacing for the collar, and everything else came from odds and ends that I've had hanging my sewing room for years and years.  My dress fabric came from estate sales - I think it was $5 for a large trash bag completely filled with fabric.  I picked out two shorter lengths of fabric that I couldn't do much with on their own, but when combined together, I had just enough for this dress.  The burgundy velvet came from an old bedskirt, and the tassels were freebies from my husband's work.  I bought the wool hat blank on clearance from Target last year (I still can't figure out how on earth you were supposed to wear a floppy, wide-brimmed blank as a modern hat!), and the feather, shoe buckles, and eyelet dickey were all odds and ends from the Antique Elegance show that I picked up with no specific project in mind, but they were too cheap to pass up.  Lately I've been trying really hard to not buy fabric or other costuming materials unless I have an actual project in mind for it, but this outfit totally justified collecting a bunch of random materials "just in case" from time to time too.  I have decided that 2013 is going to be the "year of the stash" for me, and this was a great project to get the ball rolling.

So that's about it.  You can see more photos of all of the fabulous 1910's ladies and gents from the DFWCG on flickr, and here are a few more shots of my dress for good measure.


Saturday, December 24, 2011

1910's corset pattern and instructions


In 2010, I wrote 2 articles for the online magazine Foundations Revealed about how I created a recreation of an antique corset from the mid-1910's. After a year on that site, I regained the rights to republish that article for free on my own website, so I thought I would share that with you all as a little holiday present from me! The original articles had more information about the research, pattern cloning techniques, and comparisons with the original garment, but I figured that people would be the most interested in the pattern and construction instructions, so this is a condensed version. This corset is a very easy garment to make up, and I hope this helps some of you with your 100 year Titanic anniversary and Downton Abbey costumes in 2012. Merry Christmas to you all!  :)


finished

Sunday, October 30, 2011

Edwardian recap

DSC05460

Once again, I am horribly late when it comes to post-event blogging.  *eek*  Where does the time go!?!  But back in mid-September, the costumers from the DFWCG had their semi-annual gathering at the Antique Elegance Show, and I whipped up a sunny linen gown to wear to it.  I used two vintage 1910's patterns from my stash to make the dress, which was a ton of fun.  It practically makes me giddy to use real 100 year old patterns to make something new!  I really like the way this transitional style still has the slightly poochy bodice and A-line skirt of the Edwardian period, but it is combined with the short sleeves and streamlined shapes of the 1910's.  It's a very fun style, and so easy to wear.


1910 - Peerless Pattern 5771 1912 - May Manton's 7174


The body of the gown was made with a dollar's worth of estate sale linen, and the windowpane linen for the top of my bodice was a curtain from World Market that my husband brought home for free since it was damaged.  The hat was also from an estate sale and only cost $2, and the ribbon is made from a decorator sample piece of silk that I also got from free.  I did buy some vintage mother-of-pearl buttons for the back closure for $5, and the buckle on my hat cost around the same, but all together, the whole outfit cost me under $15, which might be a record for me.  I love cheap costumes!

DSC05482
One of my favorite parts of this costume has to be my hat. It was vintage straw hat with a shallow crown that appeared to have come from some Asian country, but I stretched the crown to make it wider, and then cut it off and raised it a few inches to make it deeper. It still doesn't have the massive crown size that true Edwardian hats usually have, but at least it is closer now. I covered the extension in the crown with fabric pieced together to look like wide ribbon. I am proud to say that there is not one drop of hot glue in this hat, which might be a first for me!

The super-sheer fabric at the top of my dress scared the bejeezus out of me at first because I couldn't figure out if should line it or just let my undies show (*gasp!*)  I eventually solved the problem by buying a pretty 1910's brassiere, and I just let it show through the fabric, which is exactly what the Edwardains would have done.  I learned a ton about period brassieres in the process, and I even went on to write a two-part article about them for Foundations Revealed, which will come out in December and February. The first article covers the history of Edwardian/1910's brassieres, and the second one will teach you how to make one yourself based on the vintage brassiere that I am wearing with this outfit.

Other than being neck-deep in writing articles this past month, the other reason why this post is so late is because I really wanted to do some faux-vintage photos with some of the pictures that we took that weekend.  I finally found some time to do that today, and I am really pleased with the results.

Edwardian self-portrait

I've been experimenting with faux-vintage photography for years, but I now teach a digital photo class at work, and my Photoshop skills have improved drastically.  I finally have some better skills for making the pictures do what I want.  I figured out that the biggest issue is to try and duplicate the shallow depth of field that you see in old photographs where you have a blurry, light background and foreground.  Modern point-and-shoot cameras try to keep everything in focus, and it's a dead giveaway that the the faux-effect is a fake.  It's amazing what a difference that makes!  I also have some more sophisticated photoshop actions to create the sepia look now, and I overlaid the photo with a scan of paper foxing to give it a slightly speckled look.  Here are a few original pictures that I was looking at for comparison when making my photo.  

christy and me


I also tried my hand at copying the look of a different style of period photography, inspired by this fun picture of two Edwardian ladies showing a bit of ankle.  (oh-la-la!)  I didn't have a suitable glass plate frame to use around the picture, so I used one of my scanned tin-types for the border instead.  It gives it a slightly different look, and I don't think this fake is as convincing as the other, but I still like the results.   My friend Christy and I had entirely too much fun posing for this picture!

You can see the rest of my flickr set from this event here.

Sunday, September 11, 2011

Edwardian Collar Stays

Now that I have finally caught up with blogging about my finished costumes from this summer, I can once again turn my attention to current and future projects.  At the moment, I am finishing up an early-1910's dress that I am making to wear to the Antique Elegance show next weekend.  I've really learned a lot with this project, and I've had fun trying out some period techniques that are new to me.


The bodice that I am making has a tall collar, and I knew that it would need some support to keep it from wrinkling or sliding down.  The only problem is that my fabric is a very sheer windowpane linen, so I didn't want to use thick boning channels that would detract from the delicate fabric.  So what did women in the 1910's use to solve this problem?  A quick search on Etsy turned up this lovely card of antique collar stays, so I snatched them up for "research" purposes.  Don't you love shopping for a good cause.  :)

The card of stays was so beautiful and pristine that I wouldn't dream of using the originals for my dress, but at least I could measure them and figure out how they were made.  The wire is stiff, but still bendable, and it is covered with white silk.  It seemed very similar to millinery wire, so I drug out some of my own millinery wire and decided to give it a try.  It was very easy to bend the wire into a serpentine shape, but the thread covering would become frizzy or broken if I bent it with any type of pliers.  The thread didn't break if I bent it with my fingers instead of the pliers, but I couldn't get the curves in the wire as perfect that way.   I wonder if my threads were breaking because my millinery wire is so old (it came from an estate sale) or if it would do the same thing with modern wire.

When I started looking more closely at the antique collar stays, I couldn't see thread wrapped around the wires as I originally assumed.  They feel more solid and smooth - almost like they are wrapped in silk paper instead of thread.  I'm not sure if wire like that even exists anymore, but it made me wonder if you could paint millinery wire with a layer of flexible glue, like Sobo or Elmer's, to seal the threads together before bending them.  I haven't tried this yet, but it might be worth a try if any of you are considering making wire collar stays of your own.

The original collar stays were 3" long, but the card lists other sizes that they came in.  I made mine be 2 1/2" and 2" long to fit my collar better.  Even though my reproduction collar stays are not as pretty as the original ones, they still work wonderfully.  I can't feel them at all when wearing the dress, and they blend in with the sheer fabric very well.

Sunday, March 20, 2011

1918 dress

So before I got eaten alive by my cutwork skirt project (BTW, I just found out that I won 1st place!  Woohoo!), I promised that I'd post more about my new 1918 dress that I made for the Chestnut Square fashion show.  Well, I added a page on my website where you can see some more pictures of this outfit, and I thought I would talk a little more about how I made it here on my blog.


The dress is made out of two wool fabrics that I picked up at estate sales.  The colors are so funky that I never thought I'd use them for anything other than mockups or linings, but I was surprised as how much more I liked them when they were put together.  

I never could find an exact pattern for this outfit, so I combined several late-1910's patterns and did a bit of improvising to create my dress.  The bodice is based on this similar 1918 New Idea pattern that I found on ebay.  I changed the sleeves to be tight fitting at the forearms, and I used an antique collar that I found at an estate sale instead of the collar style shown in the illustration.  The text that accompanied my original fashion plate told me that this was actually a skirt and bodice and not a full dress, so I decided to keep mine separate as well.  The only problem with that is that my blouse has a tendency to pull out when I move around a lot, so I added a drawstring at the waist (which is a very period practice) to try and keep it tucked in.  This helped some, so I probably will add some hooks or snaps as well to keep everything neat and tidy.  

The skirt was a little bit more difficult to make up since I never could find a good pattern match for the style I was trying to recreate.  But I looked at enough period patterns to figure out the basic shapes (mostly rectangular or very slightly flared), and then I draped the yoke at the top of the skirt on my own.  The first time I made the skirt, it had too much fullness, so I took it all apart, cut off some width on both the tunic and underskirt, and then tried again.  The underskirt closes on one side with hooks and eyes, and there are vintage buttons and loops on both side seams of tunic to add a decorative element.  Both layers of skirt are joined together at the waistline.  


I think the dresses from this particular era are totally made by the accessories, so I considered myself very lucky to already own some key pieces to put the finishing touches on it.  I bought a pair of fabulous spool heel oxfords several years ago on ebay.  They are from the 80's or 90's, but they are in wonderful shape, and they are a near perfect match for the style of shoe shown in the illustration.  I didn't even know what I would do with them when I bought them, but they were just so cool that I knew they had to be mine!  I bought the Edwardian purse last year at the Antique Elegance show.  It is made of silk moire with a crocheted top and silk ribbons, and the condition is amazingly good.  The little "Votes for Women" button was another fun little accessory that was given to me by a friend.  And of course, I've already talked a bit about my hat.  I love being able to mix in some real antique pieces in a historical costume, and the good thing about this period is that a lot of vintage accessories like buttons, lace, and purses are still around if you just do a bit of digging.  


Sunday, March 6, 2011

more adventures with cheap straw hats

My son and I dressed up in our new outfits from 1918 for a fashion show benefiting Chestnut Square this weekend. I'll try to post more about my full outfit later in the week, but I wanted to start with a little post about my hat.


I had originally planned on making something using proper millinery techniques, but as usual, I ran out of time and had to settle for my more typical methods of "hot glue a bit of luck". So off I went to Party City to pick up another $5 straw hat to reshape. You can see the hat in its original (and horribly ugly!) shape here.

Like many other cheap straw party hats, this one is made of a woven blank that can be shaped however you want vs. a hat made with straw coils that is stitched into it's shape.  It is like a pair of Chinese handcuffs - if you push down on it, it gets wider, and if you pull on it, it gets narrower.  This is very convenient when you are trying to reshape the crown into one of the large 1910's styles.


To reshape a hat of this type, all you have to do it wet it, and then hold it in the shape you want while it dries overnight.  I wanted to make my crown shaped like a flared top hat, which is a style that shows up quite often in 1918.  I squeezed the middle with my hands (which also made the hat taller), then wrapped some hair bands around the middle to hold it like that.  I flattened the top just by stretching and pinching the edges.  The brim had a tendency to flip up, so I weighted it down with random bottles that I had in my bathroom.  As you can see, no high-tech tools are needed for this technique!  :)


I was inspired by a variety of images from my 1918 New Idea Quarterly for the overall shape and decorations on my hat.  The first picture shows the hat that was actually worn with the dress that I based my own outfit on.  Although I changed the shape and decorations some, I decided to at least remain faithful to the color scheme of the original, so I used black velvet for the top of the hat and a lighter mauve wool that coordinated with my dress for the lining of the brim.  The second illustration shows a hat with a narrower brim and the flared crown that is more similar to the overall shape of my hat.  The third hat has a crown covered with pleated fabric, which gave me the idea of covering mine with a similar technique.  The picture on the far right has a narrow hatband halfway up the crown at the smallest  part of the flare, which I decided to use as well.  So although my own hat isn't a direct copy of one particular style, I tried to capture the feel of 1918 millinery by combining a variety of elements from these different illustrations.  

To cover the hat with fabric, I traced around the various parts of the hat directly on the material, cut it out (plus a little extra for wiggle room), used spray basting adhesive to stick it to the straw base, then finished the edges with hot glue on the parts you can't see and a strip of bias edging around the brim.  Forgive me for glossing over the fabric steps, but it was 2:00 in the morning when I was working on it, and taking step-by-step pictures was very low on my priority list at that time.  I also took some shortcuts which resulted in the annoying wrinkles on the top of the brim.  I skipped the spray adhesive on that section, which I regret now.  I could definitely do better with some more time, but sometimes "good enough" is good enough, if you know what I mean.  Luckily, I'm tall, so maybe most people won't see that part of the hat very often.  ;)


Covering the flared part of the crown with a flat piece of fabric would have been more tricky, but still doable with a bias cut strip, more spray adhesive, and a bit of luck.  But I decided to avoid all that fiddly work by covering the rise of the crown with a 5" wide pleated silk moire ribbon that has been burning a hole in my stash for the past few years.  I wanted to be able to remove the ribbon if I ever decided to use it for something else, so I skipped the hot glue this time and hand-tacked it to some grosgrain ribbon, then I simply tied the narrow ribbon into a bow to hold it all on the hat.  A few more hand tacks at the bottom of the pleats hold the ribbon to the crown so it won't shift around.  If you don't happen to have a bunch of 5" wide vintage ribbon burning a hole in your stash, you could also do the same thing with a long strip of fabric.  

And that's it!  Total time for making this hat = 2 hours.  Cost of materials = around $20.  The thrill of having a big crazy hat to finish off your 1910's outfit = priceless. 

Wednesday, February 9, 2011

State of the Union

So even though I've been pretty quiet this winter, I have been staying busy behind the scenes - so busy that I haven't had much time for blogging.  But we have another snow day today, so it seemed like a good time to play catch-up and give you a little "state of the union... er... of jen" address!

1.  I've been working on getting all the DFWCG event graphics made and posted to our website.  We have some really cool things planned for this year, and if you are in the area, I hope you'll join us for some costumed shenanigans in 2011!
2.  I added some more vintage patterns to my flickr archive.
3.  My 16-year old cheap-o beginner sewing machine finally bit the dust, so I bought a shiny new Janome Magnolia this week!   I am totally in love with this thing!

4. I am working on two new costume projects right now that my son and I will wear in the Chestnut Square fashion show next month.

My dress is inspired by this 1918 dress from the New Idea Quarterly magazine that was given to me by my grandmother, and it is being cobbled together using a variety of patterns from my own collection and from CoPA.

My son is getting a suit made with one of my new old patterns from 1919.  I'm really excited about both of these, and I'll definitely be posting more about them soon!