Thursday, November 29, 2012

Featured Curtain-Along Sacque, by Mary Burbage

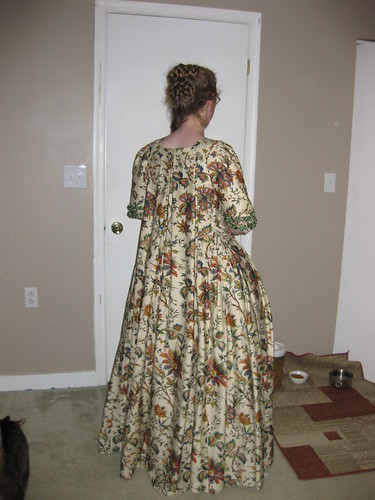
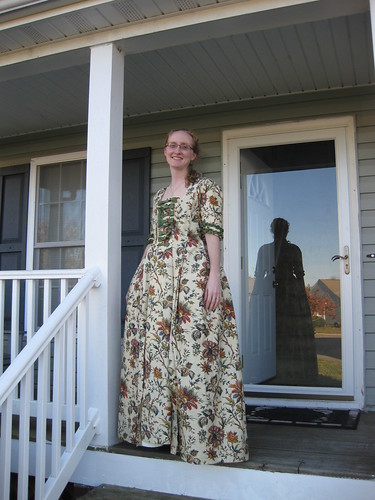
This week, we have another amazing Curtian-Along dress made by Mary Burbage.  Mary made a 1750’s Indienne print sacque, petticoat, and stomacher, and she sent us this fabulous write-up to tell you more about her work:

For the Festive Attyre Curtain-Along project, I made a 1750’s sacque, petticoat, and stomacher.

1750's Indienne Print Sacque - Front

Materials:
  • three Waverly Felicité curtain panels (from Amazon)
  • 4 5/8 yd 1” moss green china silk ribbon (from Silky Way)
  • 1 1/8 yd bleached muslin (from JoAnn)
  • 2 ½ yd 1” cotton twill tape (from JoAnn)
Patterns:

The bodice lining was a modified version of the Simplicity Pirates of the Caribbean gown (S4092). I adjusted the armscye shape a bit to make it more accurate. I also moved the side seam back further, again to make it more accurate. I omitted the lacing because I didn’t feel like fooling with it this time around. I knew it should fit reasonably well since it had been fine when I made my celadon sacque a few years ago.

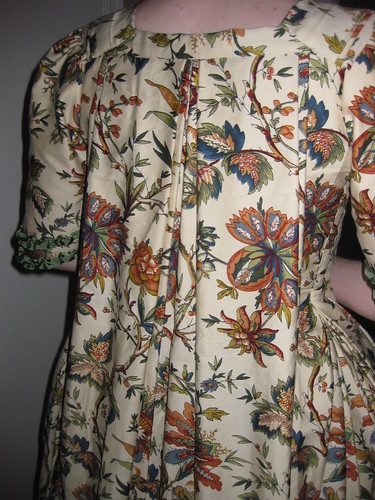
The sacque itself was draped on the dummy following the tutorials on The Fashionable Past (http://koshka-the-cat.blogspot.com/2011/03/draping-sort-of-sacque-part-one.html) and patterns in Patterns of Fashion: The Cut and Construction of Englishwomen’s Clothes 1660-1860 by Janet Arnold  – the 1745-1755 sack for wide hoops on pp. 32-34 and the 1745-1755 pet-en-l’air on pp. 28-30. The sleeves were taken from the 1770-1775 sacque on pp. 34-35, mostly because I already had that pattern piece printed out from last year’s rust taffeta en fourreau gown.

The petticoat was the same as my rust taffeta petticoat from last year, which used the 18th century petticoat tutorial on Katherine’s Dress Page. This tutorial is similar to the petticoat tutorial on A Fashionable Frolick except that it also covers waist shaping.
The stomacher is just cut to a pleasing shape.

Construction:

The sacque, petticoat, and stomacher are made of indienne print cotton sateen. The bodice, sleeves, and stomacher are lined with muslin. The sleeves are trimmed with two rows of ruched china silk ribbon, and the stomacher is trimmed with eight china silk bows in graduated sizes. All pieces were sewn by hand.

There’s really not much else to say about construction since the tutorials are so detailed.

I’m still not quite sure that trimming the sleeves with ruched ribbon rather than having cuffs was correct for the 1750’s, but I can use the fabric out of the curtain tiebacks if I decide to make cuffs in the future. I’d have to do a lot of piecing if I were going to try to do it with the scraps from the curtain panels.

Because of the method of making the bodice by cutting out the armscye and folding/pleating the rest of it, this really did take practically all of the three lengths of fabric. I was able to make the matching petticoat without piecing in a different fabric at the top, but I did have to do a little piecing to make it work. I did not cut this with a train so that I could dance in it. I saw several online that were trained, which was appealing but not so practical.

1750's Indienne Print Sacque Closeup 1750's Indienne Print Sacque Closeup

Undergarments:

I wear this gown and petticoat over a chemise (Simplicity 3635), fully boned stays (Simplicity 3635), pocket hoops (Simplicity 4092), and two petticoats based on the same tutorials as the print petticoat.

Thoughts after wearing:

I love this dress. It was great to wear and had great range of motion for the arms. I had absolutely no problems dancing in it, even doing “The Duke of Kent’s Waltz” where the lady keeps turning under the gentleman’s arm.

I am definitely looking forward to wearing it again at Holidays at Smithfield. I doubt anyone will mind the 1750’s gown at the 1770’s plantation!

1750's Indienne Print Sacque - Back

Saturday, November 24, 2012

two new curtain dresses

A few people have asked me how they can share pictures of their curtain-along dresses if they don't have a blog, and the answer to that one is easy - just send it to me and I'll post it for you!  It'll be fun to showcase the work of others here on my blog, and it brings back good memories of when I used to do that years ago on the Featured Attyre section of my old website.


So I'm incredibly excited to get the ball rolling with two new curtain-along projects made by some of my local friends in the DFWCG.  First up is Chloe Hinton who made a lovely jacket using the caraco pattern in Janet Arnold's Patterns of Fashion.  To dress it up a little, she trimmed the edges with box pleated grosgrain ribbon.


And next is Erin C. who sent me this description of her gown:
The dress was made using Sense & Sensibility's Portrait Dress pattern. I'd never made one of their patterns before, and was pleasantly surprised that I didn't have to make any adjustments aside from sleeve width and cutting the neckline slightly lower. The mustard petticoat is a linen I bought at Joann's. Shoes by American Duchess (of course). The hat I decorated from a plain straw one from Jas. Townsend.


If you have any questions or feedback for either of these lovely ladies, just leave it in the comments and I'll make sure they get the message.  And if anybody else has completed curtain-along projects that you would like to share, email me at jen(at)festiveattyre.com


Friday, November 23, 2012

the 1790 Redingote


So my original plan for the Georgian Picnic was to make my curtain-along jacket, but as you can see, that didn't happen.  I am a hopeless sheep when it comes to costumes, so when my wonderful friend from Before the Automobile decided that she was going to make a redingote for our event, I decided that I HAD to have one too!   I've been wanting a redingote for years and years, but I've always been intimidated by the tailoring involved.  Luckily several of my online friends who have made redingotes in the past helped me out and shared patterns, construction tips, and fabric sources to get me started.  I am SO grateful for their help!

I think one of the hardest parts of this project was trying to decide on a style.  I obsessed over the images on my redingote and riding habit pinterest board for months before finally settling on these two  portraits featuring redingotes from around 1790.   I love the extremely low pigeon-breasted look of the bodice on the left - especially when combined with the sash.  Once again, it's a perfect example of that late 18th c. transitional style that I love so much.

But instead of doing an exact copy of this first dress, I decided to combine it with elements of this second portrait that is undated, but has many similar elements in the overall style.  I loved the fringe, figured buttons, and the shape of the cuffs, so this gave me ways to dress up my redingote a little and make it more unique.

My dress is constructed from wool twill and lined with heavy linen, and it is 100% hand-sewn.  Because the color would have been impossible to match exactly, I made my own fringe from strips of the wool that I unraveled.  It is really easy to make your own fringe, and it actually goes faster than you would think.  My buttons are the large feather style pewter buttons from Quartermaster General.  They were shiny silver when I got them, but I added some black enamel paint in the recesses to make the design stand out better.  My neckerchief is made from silk organza, the petticoat is cotton voile, and my sash is satin.  The hat is a cheap straw gardening hat that I found at an estate sale.  I covered it with wool and decorated it with a vintage moire ribbon and a few feathers in a manner somewhat similar to the all-black hat shown at the bottom of this fashion plate.

I didn't take construction photos because I'm still a total novice when it comes to proper 18th c. dressmaking techniques, so I don't want to lead anybody astray or draw attention to all of my mistakes.  But I will tell you that I the lower lapels are interlined with heavy linen, and the capes are interlined with medium weight hair canvas.  Although the lapels worked just fine without the hair canvas, I wish I had interlined the front of the bodice with hair canvas.  Because the bodice is so extremely low cut there isn't much there to support the weight of the lapels, so it tends to droop a little and make wrinkles on the lower bodice.  I might try to retro-fit the bodice with some more interlining to see if that helps a little, but that was my only major complaint about the way it fits.  The capes were crazy looking at first because they were so stiff and perky, but after lots and lots of steaming and shaping over a tailor's ham, they decided to cooperate and lay nicely. I will also need to go back and re-hem my skirt at some point.  It's about an inch longer than it should be in the front, and the method that I used for the hem was a complete disaster.  I used the le point a rabattre sous la main stitch described in Costume Close Up, but the way the thread wraps around the edge of the hem makes it snag easily on just about anything, and my skirt was a puckered mess before the end of the picnic.  Oh well, lesson learned.  

One of the scariest parts about this project for me was figuring out the pattern for the bodice, so I thought I'd show you what my pattern pieces looked like.  Sometimes it's just nice to know what shapes you should be shooting for.  My pattern was made from a combination of draping and looking at the redingote pattern diagram from the book Die Kostümsammlung der Familie von Bassermann-Jordan als Beispiel für die zeitgenössische bürgerliche Mode von 1760-1870 by Heidede Biegler-Sander.  Although the huge lapels and capes look really fancy when they are done, they were very straight-forward to pattern.  I had to do a bit of alterations in the final fitting, but this still pretty close to what I used for my dress.


So that's about it.  I didn't get a lot of formal pictures of my dress last weekend, but maybe I'll get a chance to do some more this winter.  Thanks again to Cynthia and Christopher for letting me borrow a few of theirs, and once again, you can find more candid pics in my flickr.


BTW, this is my "OMG I'm at the GEORGIAN PICNIC" happy face!  :)

Wednesday, November 21, 2012

4th Annual Georgian Picnic

This past Saturday, the DFWCG hosted my favorite event of the year - our Georgian Picnic.  I'm having a hard time putting into words exactly how amazing this event was, so I'm just going to let some of my favorite the pictures do most of the talking.


Okay, I could keep going and going, but I'll just point you to my flickr album if you'd like to see more.  Many thanks to Christopher, Cynthia, and Maggie for letting me use several of their pics.  I'll be back to talk more about my new dress later this week.  

Hope to see you at next year's Georgian Picnic!