Sunday, May 23, 2010

reshaping a beachcomber

My original plan was to make a 1910's hat for my suffragette costume out of straw braid, but I ended up running short on time, so I decided to go with a tried and true method instead.  These cheap beachcomber hats can be found at Party City for $4.99, and there's usually a good variety to the size and color as well.  The one that I picked out was a medium size.

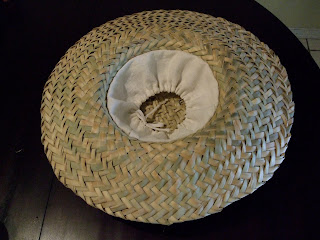
The first step is weaving the extra straw back into the hat (or you could cut it off if you aren't feeling that ambitious).  It took me about an hour and a half to do it, but it was strangely satisfying work!  My best advice is to trim the ends of the straw so they are blunt instead of pointy, and to weave the parts on the flat of the brim before you do the edges.


Next, I wet the hat and weighed down the brim with a bunch of bowls so that it would lay flat.  Then I placed a large bowl on the crown plus a bit more weight to push it down.  These hats are like Chinese handcuffs in the way they are woven - if you push down on them, they get wider, which works wonderfully for making the wide crowns that are so characteristic for the hats from this period.   


I left it like this to dry overnight, and now it holds its new shape.  Easy peasey!  

The crown is a good bit wider than my head now, so I sewed a strip of fabric to the inside with a drawstring that ties in the middle.  This helps to stabilize the hat so it doesn't bobble around so much, and by adjusting how tightly I tie the cord, I can adjust how high it sits on my head.  

Once the straw is shaped, you can cover it with fabric, like I did for my black 1910's hat.  I made that one with a beachcomber too, but I shaped the brim up by tying rubber bands around it instead of laying it out flat.  You can also paint or dye these hats, but I think I'm going to leave my straw plain since a rustic look seems appropriate for a summer picnic.  

Here's a crappy picture of it on my head so you can get a feeling for the scale, but you'll have to wait until this weekend to see the decorated finished product!

Thursday, May 20, 2010

suffragette ribbon


I painted a suffragette ribbon today.  It is based on the one found here, but I omitted the shadow on the letters to make it easier to paint.  If any of y'all want ribbons like this, you can either paint them there (I'm making a stencil to speed up the process), or I'll make one for you ahead of time and have it ready for you.  Just let me know!  Of course, feel free to make your own in a different style too.  I think some variety would be cool!

Sunday, May 16, 2010

the pros and cons of perfectionism

So in my last post, I was angsting about the darker green trim.  Even though all of you good readers, my husband, and my mom all told me that the green was great and I was crazy for worrying about it, I knew it wasn't going to make me happy.  I just had to go with my gut on this one.  But unfortunately, the bright-white stripes in my fabric didn't match the off-white of my silk.  Oh noes!  So silly me, I threw it in the wash with a few cups of coffee and didn't bother to finish the edges of my pieces first.  How bad could it be?

Uhhh... bad.

This has to be the frayingest fabric that I've ever had the joy of working with.  It frayed through my 5/8" selvage and beyond.  I was so upset on Friday that I was seriously considering ditching the whole project, but by Saturday my stubborn nature had taken over, so I gave it one more try.  

I was able to fix the skirt by trimming off the tangled mess and turning the seams into French seams, so that wasn't too big of a deal (but my skirt inset is on the wrong side now - oops!)  But the bodice was more problematic.  I tried trimming the selvage down and assembling it with smaller seams, but it didn't fit anymore.  So I took the little bit of fabric that was remaining and cut all new bodice pieces, even though this meant that I had to carefully piece a few sections because my remaining scraps were so small.  

All this silliness cost me a day's worth of work, but now that the dress is assembled, I am SO glad I did it.  I looooove the white trim.  It looks so much more delicate and soft than the green did.  Seeing this dress come together is making me absolutely giddy.  I still need to make the undersleeves and dicky and mount it all to the underbodice, but I still have 2 weeks to do that, so I should be fine.  


Friday, May 14, 2010

color indecision


The dress is going together now, but I'm having second thoughts about my trim color.  I found some silk shantung in a darker pewter green color, and I've spent the past few days cutting bias strips, carefully basting it to the edges, making buttons, and twisting cord out of embroidery floss.  But now that it's coming together, I don't think I like it.  It almost overpowers the delicate green of the main fabric.  Now I'm wondering if I should switch the green trim out for off-white, like I had in my design sketch.  

So what do y'all think about the darker green trim - yea or nay?  It would cost a couple hours of work to  change it, but nothing too serious.   I'm about to hit the point of no return though, so I have to decide by tomorrow. 

Monday, May 10, 2010

an interesting fashion statement


I worked on my new 1910's corset last week, and although I still need to add the garters and bottom edge binding, it was finally done enough to try it on.  Quite an interesting fashion statement over my work clothes, don'cha think?


Saturday, May 1, 2010

design choices


Thanks for the feedback about the fullness of my skirt.  I feel a lot better about using that one now, but I got bored and made up some design sketches just to see if I liked anything better.

1. The original dress.  It's clean and elegant and I like being faithful to the original.  But I think it looks a bit bath-robe-ish, which makes me hesitate.
2. The double layer Butterick skirt.  I've made this one before so I know it looks good on me and is easy to make, but I'm not crazy about the way it looks with the kimono bodice.  They don't seem to fit together just right.
3. This skirt is inspired by an antique 1910's pattern that I bought today. It's one of those transitional styles, and the back looks very much like the original skirt, but I thought the center panel with some tabs would give it a nice tailored look.  I think this one is my favorite at the moment.
4.  Straight skirt with a border, inspired by that photo I liked.  I like it, but I'm not sure I love it.  I could also change the color of the borders, but I'm still having a hard time picking a color.  I found a blue-gray that was pretty, but it didn't seem like the most "period" choice, if you know what I mean.

Anybody want to offer a vote?  I'm going to think obsess about it for a week and then start cutting.