Saturday, November 26, 2011

Georgian period toys

DSC06805

I LOVE making silly props to go with my silly costumes, and our Georgian picnic gives me the perfect opportunity to research and recreate 18th and early 19th c. toys and games every year.

The first new toy that we tried this year was the Chinese yo-yo, or diabolo (diable in French), which has proven a bit hard to research, but several online articles mention that it was called "devil on two sticks" in England, although they don't mention a source for that tidbit.  But illustrations of adults and occasionally children playing with diabolos show up from time to time during this period, and I love how beautiful the people look while playing this game.


I first tried using a wooden diabolo that I ordered online from a English historical toy site.  But even though the wooden diabolo looked like the illustrations, it was so lightweight and hard to work that even my friends who are jugglers and quite good at the diabolo had a hard time working with it.
DSC06694

So we switched over to a modern diabolo, and that worked much better.  Cynthia, our resident diabolo expert, was able to give us lessons, and several people were able to able to get it going pretty well and even catch a few tosses after a bit of practice.  But nobody did it with the same elegance and grace as Cynthia!  Clearly, I need to buy a modern diabolo and spend the next 12 months practicing so I can do this next year.  :)

DSC06726

DSC06720

I also brought a variety of small wooden toys, such as a top, cup and ball, and a yo-yo.  The top and cup helped entertain the kids, but I really brought the yo-yo for the adults.  I've always been charmed by this 1790's illustration of a woman playing with a yo-yo, which was known as a bandalore, l'emigrette, or quiz in the period.  If internet articles are to believed, the yo-yo was a very popular toy for both adults and children in the late 18th c., especially among the nobility, and the action of the toy was equated with French nobility and their emigration out, then back in to the country during the French Revolution.

For my yo-yo, I simply bought a bamboo yo-yo from World Market, then painted it with concentric circles, which seems to be the most common form of decoration.  Of course, French revolutionary colors seemed appropriate as well.

DSC06681

But the toy that I was the most excited about was my period kite.  I used the instructions found on the  PBS Ben Franklin website to make my kite, and I made it with handmade paper, linen ties on the tail, and I painted it with a simple triangle border, which was inspired by this 18th c. pear top kite.   I was worried that it would never fly, but it actually worked pretty well!  Although it was a bit unstable and really preferred to crash spectacularly into the ground, we did get it up to a nice cruising altitude one time, as seen in the photo at the top of this post.

I had a blast running back and forth down the clearing with my fellow kite enthusiast, Ginger, and we even drew quite a crowd of onlookers while we were flying it.  It was a blast, and I can't wait to try it again next year!

DSC06793

DSC06768

I'm always looking for new period toy and games to keep us entertained at our events.  We've also played Graces and battledore and shuttlecock in the past, and I'm hoping to try ninepins or lawn bowling next year (if I can find an affordable set).  If you know of any other good Georgian games that can be played outdoors, I'd love to hear about them!  And just for fun, check out this excellent site for other 18th century toys and games in period art.


1790's round gown and open robe

DSC06629

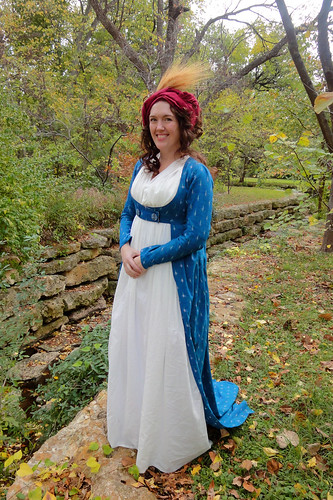
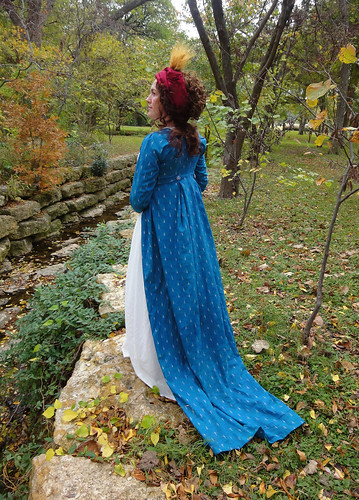
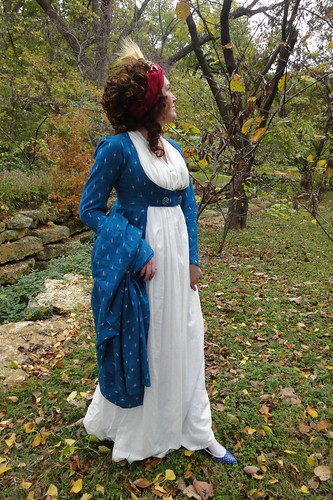
Last weekend, I attended the 3rd Annual Georgian Picnic hosted by the DFWCG.  This event is one the highlights of my year, and was so thrilled to finally be able to make a style that I have lusted after for years now - a 1790's open robe.  I started by assembling a collection of open robe images in Pinterest to help me get a better feel for the variety of open robe styles out there.  Although I knew that I could fake a lot of things with this style and still get a really nice look, I wanted to take the time to try out some new period construction skills and pattern diagrams.  I ended up doing more hand-sewing and draping on this outfit than on anything that I've ever made before, and I really loved the process, which is a bit surprising to me since I usually don't enjoy hand-sewing all that much.

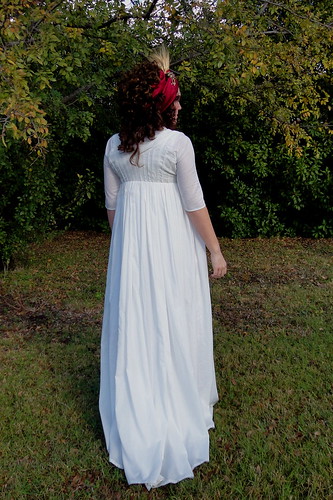
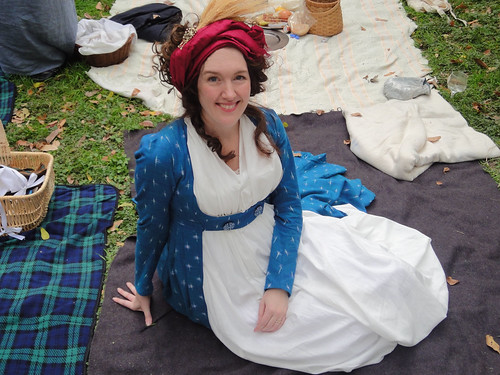
bodiceThe white round-gown worn under the open robe is a copy of this 1797 gown from Tidens Tøj. (the link is sadly broken now, but Aylwen has a screenshot of the pattern and her own beautiful photos of the dress on her blog.  Thanks, Aylwen!) Although I was a bit intimidated by the pattern diagram at first, I was offered some help from dear friends translating the text, and it ended up going together beautifully. The sides and back of the bodice were covered with hand-sewn tucks that were mounted onto a linen foundation, and then the outer fabric was cut down to size.  This was actually a really easy way to work, and I enjoyed having some mindless handy-work to keep me occupied during my lunch breaks.  At times it seemed a bit silly to spend so much effort decorating a part of the dress that wouldn't even be seen, but hopefully, I'll find another occasion to wear the round gown on its own someday.  The round gown is made up from some really lovely heirloom batiste that I got from Fabrique thanks to the gift card that I received from their remnant challenge last spring.  Thanks again, Fabrique!

DSC06976DSC06953

DSC07017The open robe is made from some ikat cotton that I bought fromHeritage Trading Company, which has GORGEOUS block-printed and ikat fabrics that are perfect for dresses from this period.  I used the open robe pattern in Patterns of Fashion for the construction, and although it looked like it would be easy to put together, it actually turned out to be pretty difficult.  My main problem is that I don't have a dress form that is my size, and this type of gown is draped to the body.  I ended up using a dress form that was close, but not a true match, so I had to get dressed up over and over again so I could try it on and make modifications... which was tiresome.  But I finally got it to work, and the way that the pleats are top-stitched to the lining means that it almost holds the shape of the body even when it isn't being worn, which is pretty cool.  The only real modification that I made to the pattern is making the sleeves full length instead of 3/4, and I added some tri-color death's head buttons to the front cross-over as a bit of embellishment.

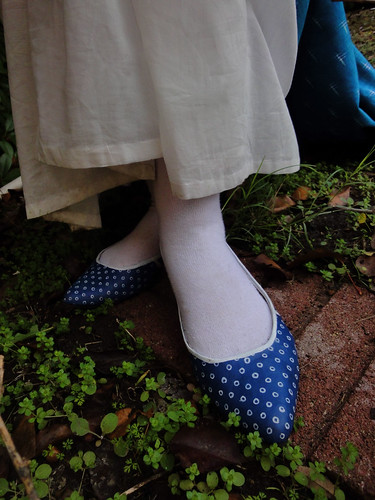
For the finishing touches, I decorated a pair of cheap Target flats with a white paint pen so they would have a pattern similar to these 1790's slippers. The vamp is a little low on these shoes compared to period examples, so I had planned on making some rosettes to cover that part up some more.  Unfortunately, that was one of the only things that I didn't have time to get done, but I think they still work pretty good either way.

DSC07072

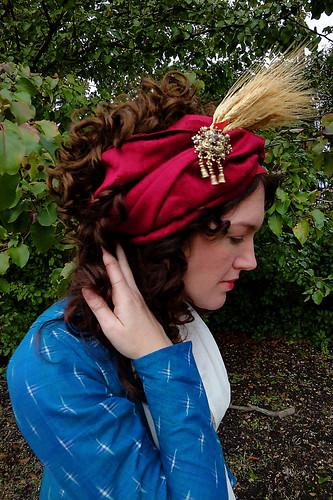
For the headwear, I wore a turban that was made from a silk curtain panel that was cut in half lengthwise.  I just wrapped it around my head and pinned it in a few spots, so it was about as low-tech as you get.   Instead of using feathers to decorate it, I used a spray of wheat, which is a tip that I learned from Lynn McMasters' article about Geogian turbans and the charming illustration seen here.  I tried quite a few colors of fabric before ultimately deciding on red, but I really liked the rich, jewel-like colors, and red/white/blue was a popular color combo in the 1790's thanks to the French Revolution.

DSC07062

Here are a few more of my favorite pictures of my dress from the picnic, and you can see the full set on flickr. I'll be back to tell you about some of the cool 18th c. toys that we played with in my next post.

DSC06631

DSC06632

DSC06873

DSC06744


DSC07022