Sunday, January 29, 2012

the "oh crap" moment

Have you ever had that feeling when you try on a project for the first time and you discover that the absolutely perfect costume plan that you've had in your head for months and months is nowhere near as perfect in reality?  Unfortunately, I had one of those horrible "oh crap" moments today.

This March, the DFWCG is having a steampunk tea party, and my plan was to make a super fabulous 1890's cycling costume based on this:


I found the perfect pattern for the jacket in 59 Authentic Turn of the Century Patterns, and I used my nifty apportioning scales to enlarge it to my size this week.  The enlarging went pretty well for the bodice.  The fit through the body is great, and all I would need to do is adjust the darts a little.  The back collar piece was slightly too big, but it would be an easy fix.  The sleeve, on the other hand, was WAY too big, which happens fairly often when you are enlarging one of these patterns that uses the bust measurement ruler for everything.  I could go back and try to draft another one with a smaller scale, or I could just alter the sleeve that I have to make it fit better.  I am not overly fond of the pleating pattern this sleeve uses, but again, I could change that with no problem.  I also messed up and used the bust scale instead of the waist scale for the skirt of the bodice, so it was way too big and I will definitely need to redraft that if I decide to move forward.

So the pattern is working fine, but here's the problem.  I underestimated the amount of effort it is going to take to tailor this thing correctly.  The lapels and collar are going to take a MASSIVE amount of pad stitching and stiffening to make them lay right.  And I honestly have no idea how to get the sleeves to poof out enough that they won't look sad and limp.  There is obviously some major engineering going on in a jacket like this, and I'm not 100% sure that my skills are up for the task.

Of course, I shouldn't judge a project too harshly based on the first mockup, but I tried my muslin on today and all I could think was "meh".  It makes me feel top-heavy and even with all the weight that I've lost this past year, I'm still not sure that my waist is small enough to offset the poofiness in this outfit.  Plus, the thought of all that tailoring is daunting to say the least.

I just don't know.  Maybe I'll put it aside for a week or two and let it ferment.  I don't have a plan B costume for this event, and I've already bought all the fabric for the cycling suit, so I sort of feel obligated to push on through.  What do you do when you discover that you are no longer in love with a costume that you were once super-excited about?  Continue anyway?  Find something else and not waste your time and energy on something you no longer love?  I usually try to keep going no matter what, but the results of that have been mixed in the past.  Sometimes I'm happy with the final results and I'm grateful that I didn't give up, and sometimes I waste weeks or months on something that I ultimately hate and often never finish anyway.   Maybe I should try a different plan this time and cut my losses now and start looking for another costume idea.

We'll see...

Friday, January 20, 2012

pattern drafting with apportioning scales

A lot of people seem to be intimidated by the pattern diagrams in the Frances Grimble books that use apportioning scales to help you enlarge the patterns.  This technique uses special rulers that allow you to draw out the pattern in your own unique size for a custom fit.  Once you get the gist of how it works, this technique requires almost no math and very little thinking.   I *LOVE* using this type of pattern, and I've had really great results with the dresses that I have tried in the past, so I thought I would make some video tutorials to show you all how easy they really are to use. Please excuse my choppy endings. My video editor refused to work with these files, so they are pretty rough around the edges.

The first video talks about how to select the correct apportioning rulers based on your own personal measurements.


The next video walks you through the process of drawing a pattern piece with your custom rulers.


Important things to note:

1.  The apportioning rulers in the Edwardian Modiste book can also be used for Kristina Harris's books of 1890's dress patterns (links to all below).  Harris doesn't include the apportioning rulers in her books, so this is a huge help if you want to use her patterns!
2. The Grimble and Harris books that use pattern systems from the 1880's and 1890's only use the bust measurement ruler for everything that you draw, including the sleeves.  But the system used in the Edwardian Modiste is slightly different, and there is a somewhat complicated way that you are supposed to measure your arm length.  Finding this sleeve length measurement is probably the most difficult step of the entire pattern drafting process, but there is a description of how to measure your arm length on pages 7-8 of the Edwardian Modiste.  You then use your arm length for the vertical measurements in the sleeve pieces (just like we used the waist length for the bodice), while the bust measurement ruler is still used for the width of the sleeve pieces.  Grimble advises that you can also use the modern technique for measuring your sleeve length (simply measuring from shoulder to wrist), and this will get you close enough.  I haven't tried either of these methods with the Edwardian Modiste patterns, but I'll let you know when I do.
3. As I mentioned in the video, skirts are drafted with a different set of rulers from the bodice.  You use your waist measurement for all the horizontal lines (i.e. the 28" ruler if you have a 28" waist). For the main vertical line, you measure from the waist to the floor to determine the length of your skirt, and then select the ruler with that measurement for the vertical baseline on your pattern (i.e. use the 41" ruler if you want your skirt to be 41" long).
4. For dresses with the bodice and skirt all in one, you will use your waist length ruler for the vertical line on the bodice section, and the skirt length ruler for the vertical line on the skirt.
5.  Be warned that the hips on these patterns will probably be too large for most modern figures, but you can always take them in if you need to on the muslin.
6. Even when seam allowances are not marked on the pattern pieces, they sometimes ARE included on the patterns.  The armscye is a good example of this - you might not need to add selvage to the armscye and sleeve-head on some patterns.  But you won't know for sure if you need the extra fabric or not until you make the pattern up, so it is better to add seam allowances just in case.  You can always cut them back off if you find that you don't need them.
7. The type of corset that you are wearing is very important when selecting the proper rulers.  The waist position on my Edwardian corset is much higher than it is on my Victorian corset.  If I am wearing the wrong corset (or none at all) when I measure my back length from my neck to my waist, it will completely throw off the fit of your garment - especially on these late Edwardian patterns where the waistline is intended to be relatively high.

Well, I hope this was helpful!  Let me know if you have any questions on any of this.  I am actually more familiar with using the apportioning systems in the Fashions of the Gilded Age and the Harris books, but I know that the Edwardian stuff is the most popular right now.  But all of the systems are very similar, so once you get one under your belt, the rest are much easier.  Now go forth and draft fabulous patterns! :)

(P.S. - if you would like to buy one of these books that uses apportioning rulers to draft patterns, feel free to use one of these links and I will get a little bitty contribution to my book fund. Thanks!)

Sunday, January 15, 2012

Mat Hatter costume

DSC07694

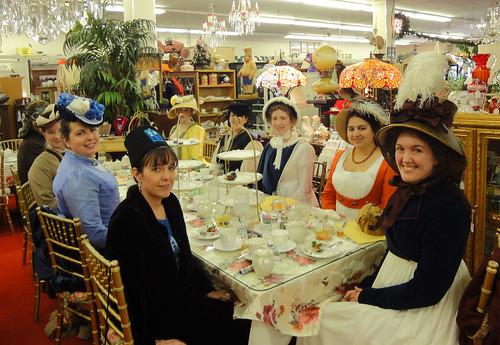
Yesterday was the DFWCG's Mat Hatters Tea Party, so I wanted an appropriately flamboyant hat (and new costume to wear with it) to celebrate the event.  I've spent the past 2 months angsting about what to make, and I think I started working on at least 3 or 4 other possibilities before I finally settled on a simple 1790's spencer and bonnet.  But I ended up loving the final outfit so much that now I can't imagine wearing anything else!

DSC07762

To save time, I focused on making something new to dress up my round gown that I made for the Georgian Picnic in November.  I didn't know a lot about Empire spencers, so I started by creating a 
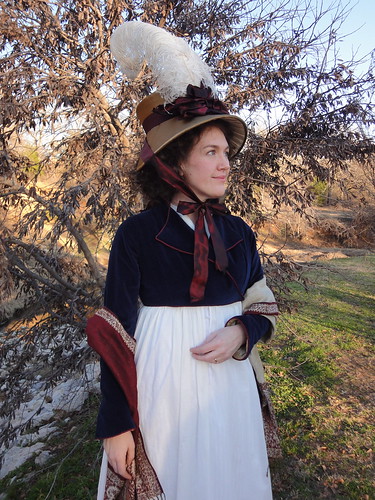
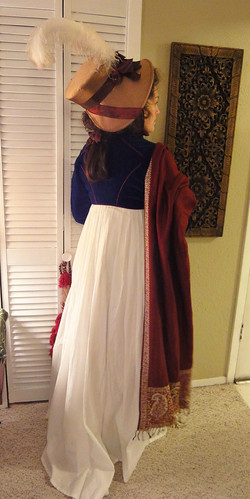
Pinterest board of all the 1790's examples that I could find.  I was amazed by how many dark blue spencers there were in the illustrations, so I went digging through my stash and found a dark blue velveteen curtain panel that I picked up at an estate sale last year.  It was just enough fabric for a spencer, so I decided that it must be fate!  It is lined with some golden yellow striped silk that also came from my stash, and I even found some burgundy cording in my bin of ribbons that was perfect for accenting the edges and back seams like you see in many of the jackets from this period.

I usually have some sort of period pattern diagram to get me started with my costumes, but this garment was 100% draped from scratch.  I knew where the seams should be thanks to the illustrations and a few surviving examples, so I used one of my paper tape dress forms to drape the body and collar.  I did look at a pattern diagram for an 1790's youth's skeleton suit to get the general shape for the 2-part curved sleeves, but then I just free drew the shapes and tweaked them for a few days until I got something that fit just right.  I know it is not an overly complicated garment to make, and there are still a few nit-picky things that could be improved, but I am really proud of the results considering that this was the first time for me to make something using this method.

DSC07766

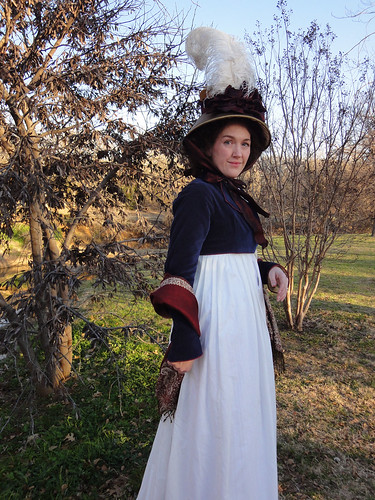
The most fun part of this outfit is definitely the hat. Once again, I made a Pinterest board to help me research 1790's bonnets, which was extremely helpful when it came down to deciding on the shape and adding the decorations.  I found 
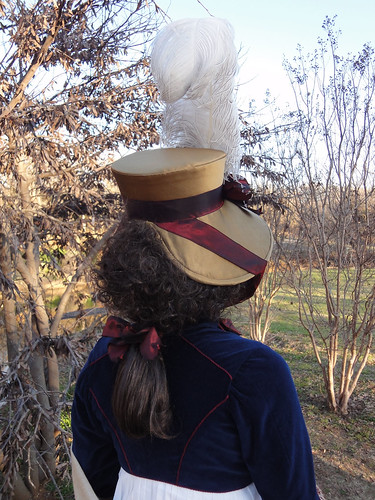
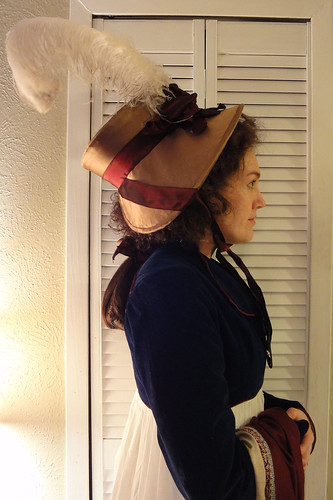
several examples of wide brimmed bonnets with a big bow and super-tall feathers decorating the middle front of the crown, and I thought that look really captured the quirky Empire style that set these fashions apart from other Regency period headwear.

The bonnet also marks another first for me - it's the first time I've ever built a fabric-covered buckram hat.  I used Lynn McMaster's seaside bonnet pattern to make it, but I cut the crown down by an inch because I preferred some of the more moderate-sized examples in the fashion plates.  It is covered in a remnant of bronze silk satin and lined with ivory silk, which also both came from my stash.  I sewed the entire thing by hand and there is not a drop of hot glue on it, which is a small miracle for me.  I am usually a HUGE fan of hot glue millinery!

DSC07810

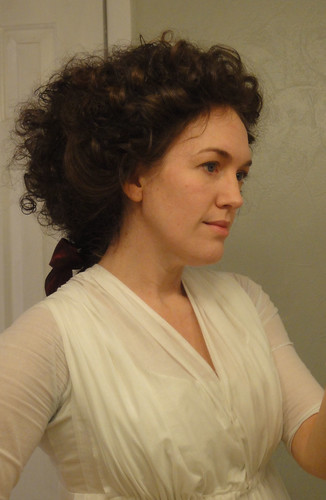
Since the costume was made completely from materials that I had in my stash, I decided to splurge a bit on the finishing touches.  I bought another Lioness wig in chestnut brown this time (I also used this style of wig for another 18th c. outfit from a few years ago).  It is great for making a huge hedgehog style hairdo and there is a ton of length for various types of tails in the back as well. This time I straightened the long part in the back with a flat iron and looped it like the style seen in many illustrations from this period.  I had some flyaway pieces that tried to escape from the ponytail at first, but I added a long flat barrette across the back of the loop after these first pictures, and that seemed to solve the problem pretty well.

DSC07640 DSC07646

I also have lusted over regency shawls for years now, so I asked around for suggestions on where to buy one.  My friend Aubry from A Fractured Fairytale suggested this ebay store, which has a variety of rectangular shawls with paisley borders, which is exactly what I was looking for. It still wasn't as long as real regency shawls should be, but at $19.99 I couldn't pass it up! I actually ended up loving this thing so much that I bought a second one that is exactly the same, and I am going to try to sew two of them together to make one super-long shawl that will be even more perfect for drapey Regency goodness.

DSC07812

DSC07768When I was younger, I didn't care for Regency fashions at all, and I swore that I would never wear this sort of dress. I'm not sure what happened, but I've turned into a complete convert and I feel so elegant wearing these styles now. Maybe I just needed to get over my obsession with tiny waistlines first, but I guess pregnancy will do that for you.

Even though I'm making a bit of a funny face in this last picture, it's actually my favorite one of all. I think I look like a meddling, match-making aunt from a Jane Austen novel in this shot.  I need a little speech bubble that says "oh, ree-aaally?" LOL!

You can see the full set of pictures from this wonderfully fun event on my Flickr page.