


 I started this project by drawing inspiration from a wide variety of portraits from late 15th c. Florence, such as this donor portrait of Lodovica Tornabuoni painted by Domenico Ghirlandaio. You can see a collection of additional images of late 15th c. Florentine dress in this gallery. I also created the design sketch shown on the left to guide my project, but my finished gown ended up much different by the time it was complete.
Below, you will find a slightly abridged version of my original 2003 dress diary which chronicled my adventures while making this late 15th century Florentine outfit.
11/30/03
To cord, or not to cord:
 To start this project. I dug out the bodice pattern that I drafted for my Italian peasant outfit, which gave me a nice place to start. All I had to do was raise the neckline a bit and change the back of the neck into a slightly rounded "V" shape, which seems to be the most common style at this time, as can be seen on a woman in "The Preaching of St. John the Baptist" by Ghirlandaio. You can see the final shape of my pattern pieces here.
I used a much lighter weight of hemp cord this time instead of the heavy cording, and I liked the results much better. The cords are just a little more than 1/16 inch in diameter, the channels are still spaced with my presser foot, and I have 4 cords per row. I made sure that the cords are flat and not twisted in the channels and then stitched across the rows in several places to lock them in place. The resulting bodice is very lightweight, flexible, and it doesn't really add any thickness to my waist, but it still does a bang-up job of eliminating wrinkles. You can see the difference below while I am standing with my typical relaxed slouch (if I stand perfectly straight for the photo, the wrinkles disappear on both sides - but my posture is horrible, so this is probably more like what you would see if you saw me in real life). The left side has a corded interlining, and the right side has just a linen interlining. I removed the color so you can see the wrinkles better.
19/29/03
Making the gamurra:
Okay, so it's a month later and I finally found some time to get back to work on this project. I've been slowly working on the gown for the past few days, but it was all pretty boring, so I decided to wait until most of the gamurra was done before posting anything here. First, I had to cord the other side of the interlining and pad stitch another layer of felt to the surface because you could see the channels though the silk because it's so thin (this wasn't necessary on the wool side). Next I put together the bodice... and then proceeded to un-pick it all and re-do it two more times because I kept messing up on the size. I'm not going to bore you with details about putting together the bodice, but I made it pretty much like the Campi dress in one of my previous diaries.
Luckily, I had already cut out and assembled the pieces of the skirt last fall because I had planned to use this fabric for a petticoat to wear with another outfit. It is made with the Alcega "skirt for a fat woman" pattern, which is a nice modest size that looks very appropriate for these earlier gowns. All I had to do was iron it, sew both layers together at the bottom for the hem, and then hand-stitch a loose gathering stitch around the top for the waist. I had a bit of trouble at first deciding between box pleats or gathers since they both appear in the portraits, but the gathering seemed easier and less likely to cause headaches on a reversible gown.
So anyway, that's about it! All that I have left to do is add the lacing rings today, and then I can move on to the next step. It looks pretty ugly with the temporary lacing strips, but here's a few quick pics to tide y'all over for now.
12/30/03
Lacing rings:


At the top, you can see the filigree bead cap and toggle clasp that I started out with, then the cut out filigree piece (cut with old scissors), and on the left is the finished lacing ring. I just used some jewelry glue to put them together. It probably would have been better to solder the pieces, but since I stitched through both the rings and the filigree when sewing them on, I don't think it will matter even if the glue doesn't hold. I also bought some larger decorative toggle rings that you can see at the bottom (the one of the left is painted with gold enamels). I think they might be a little big for this project, but it only cost $5 for 20, so I couldn't pass that up. I found some small heart-shaped rings that I might go back for as well. I had originally planned to just have the rings on the red side, but they look so pretty that I might add more on the plum side as well.
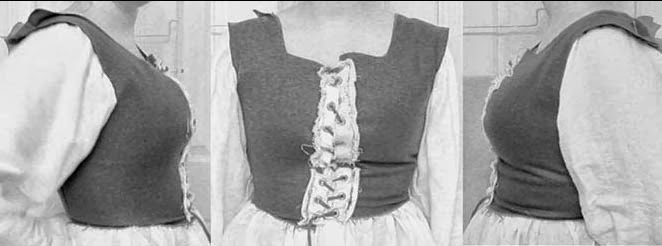
 So in the picture here, I have it laced in a herringbone pattern, which you can see in a few paintings from this period. I started out wanting to do "X" style lacing, but it was much harder to adjust the tension that way, and I just like the look of the other version better. I noticed that the bottom rings are pulling on the surface fabric a bit, so I need to go back and anchor them a little better to the corded interlining. They are attached with gold embroidery thread so you don't notice the stitches.
1/2/04
Sleeves, part 1:
 I made the first set of sleeves yesterday. Florentine women didn't typically have the long hanging sleeve ties that you see in other parts of Italy, so on this pair, the cords across the back of the arms are permanently sewn into place with no hanging ends. It's a little less fun, but a lot easier to deal with. I used the plum wool for one side of the sleeves, and some shot silk taffeta for the reverse.
When I tried everything on to show my husband, he told me that I needed to add lacing rings to the wool side of the gown because it was too boring. I kindof liked it plain since it fit in well with the Florentine emphasis on modesty, but I could see his point as well. So anyway, I decided to try the larger silver toggle rings that I mentioned in my previous entry. I thought they would be too big, but it looks better than I thought. I might keep looking for a smaller style, but these aren't bad for now.
1/10/04
Oh wait... wrong century!:

 I made the mistake of wandering down the jewelry aisle at Hobby Lobby a few days ago, and I saw those little heart-shaped charms again and couldn't resist buying them (20 for $2.50... you just can't beat that!). After laying them out, I decided to switch out the lacing rings on the wool side. I just think they are a bit more dainty and Florentine looking. Here's a close-up pic of the old rings on the left, and new ones on the right.
So once I got them sewed on today, I just had to try my dress on to see how they looked... and while I was at it, I thought I'd dig out the accessories from my 16th century Florentine costume just for fun. Coolness! That's a pretty nice look too!
1/10/04
Sleeves, part two:
It feels like I've been working on these sleeves forever! I had a horrible time deciding on the exact style for the slashes and ties, and then when I finally quit making mock-ups, it took three or four tries before I got the final version right. Sleeves are supposed to be easy - I don't know why I was having so much trouble. But I guess I just have mad skilz when it comes to making easy projects hard. 
3/8/04
Jewelry:

 I've been looking for a good Italian-style pendant necklace for months now, but haven't had much luck. But I finally found the perfect thing this weekend when I saw this pair of cheap clip-on earrings. It originally had pearls where the ovals are, but I popped them out and painted those areas with red stained glass paint so that it would look like enamel. Then I removed the clips and drilled holes so that I could hang it from a cord and add some large drop pearls. I'm really excited with the way my necklace turned out, and I think it does a pretty good job of recreating the look of the Florentine pendant in this painting.
3/9/04
In pursuit of partlets:
I made my pointed partlet yesterday, and the whole experience was a bit of an eye-opener. First of all, I enlarged the pointed partlet pattern from Birbari's Dress in Italian Painting to use as a starting point. It looks logical enough on paper, but the results make me wonder if it was ever meant to be used for an actual garment. My biggest beef with the pattern was the enormous front section, and the ridiculously narrow shoulder straps.
 So I started over again and draped my own pattern straight on the dummy using the paintings as a guide. I know it goes against everything we think we know about rectangular construction theories, but here's the pattern that better replicated the portrait for me. Curvy seams! Wasted fabric! Oh my! *shrug* But it works, so what can I say? But if anybody out there got the Birbari pattern to work without serious alterations, I'd love to see it.
 The next hurdle involved the fabric. I've been searching for a silk fabric that can match the transparency of period partlets, so I decided to try silk gauze this time. Big mistake. Even though I starched it heavily in an attempt to keep it from stretching, my hand-sewn rolled hem made it distort like crazy. It's so crappy looking that it's almost funny, so I gave up after hemming just one side. I'm sure more accomplished hand-sewers could do a better job than I did, but I still think that this fabric is more trouble than it's worth.
This just reinforces a theory that I've been knocking around for awhile now. I've started to think that we are missing the boat when we try to use lightweight silk chiffon or the stuff commonly sold as silk gauze for partlets and veils. It's the wrong type of silk (spun not reeled) and too solid of a weave. There is a photo of a surviving veil in Queen Elizabeth's Wardrobe Unlock'd which is almost net-like. If similar fabrics were used for Italian partlets, it might explain the extreme transparency that you see in many examples. To test this idea, I made a second partlet out of some very fine tulle that I had in my stash. Although it's synthetic and the weave is more modern, I think the results would be pretty comparable. Wow... what an improvement! I'll have to keep looking for a stiff, open-weave silk fabric, and if I find any, I'll make a replacement for this test partlet someday. But until then, check out the difference between the silk gauze on the left and the tulle on the right... and yes, they were made with the exact same pattern and hemmed the same way. Big difference, huh?

3/14/04
Points and hair-pieces:

Next, I tried making hair-pieces to reproduce that lovely cocker spaniel hair-style that no stylish Florentine woman would do without! I felt a bit silly buying hair extensions when I have hip-length hair, but luckily, I found some real human hair that matched my color perfectly. That has never happened before! But anyway, I stitched together a few rows of hair for each side of my head and then pinned them in place. The only problem was that the hair was really hard to curl, but I'll try to set it while it's wet next time and see if that works better than my curling iron. The hair taping was quite an adventure too. I'm not very good at "stitching" it to my head like some sites recommend, but I've always had nice results from just wrapping a braid with ribbon while it is still down and then pinning it in place.
4/27/04
An Italian cap:

 I had originally planned to make a transparent coif to cover my hair so that I could look like a proper married Florentine woman, but then I thought: "what's the use of having hip-length hair if you can't show it off every once in awhile?" There are a number of pictures of Italian women from this period with their hair down. Conventional wisdom tells us that the loose hair would signify the fact that they were unmarried maidens. This is definitely true in the painting of 14-year old Lodovica Tornabuoni, who can be seen with a loose ponytail and small cap in this portrait on the left. I know I would never pass for a girl half my age, but I have also found pictures of Italian women with these net caps and long hair who don't look so obviously girlish, such as this example on the right from the Lombard region.
5/8/05
A year later:

THE END.
(that feels good to say!)

