This pattern is based on the 17th century Italian chemise found in the book,
Cut My Cote, but I made a few modifications to simplify the pattern while still keeping the same basic shape.
Materials:
- 3 1/2 to 4 yards of white or off-white linen, silk, or cotton fabric. (linen is highly recommended!)
- the usual... thread, scissors, tape measure, sewing machine, etc.
- optional trim for the neckline


Step 1: how big do you want it?
I am a very average size... 5'6", about a size 12, with a 39" bust. If you are anywhere close to that size and want a chemise that looks pretty much like mine, you can probably just use the measurements shown on the graphics. This is very much a one-size-fits-all sort of garment, and the only part that might need tweaking are the gussets. (see Step 2 for more info about gussets) Otherwise, feel free to adjust the length or fullness of the body or sleeves as you see fit. I'm trusting that you can figure that part out on your own. The only other word of caution deals with the sleeves. My pattern adds 12" to the normal length of my arms to create the large puffs at the shoulder of a Florentine gown. If you are making this for a gown with puffs on the sleeves, you'll want at least this much extra, and possibly more. If you are wearing some other type of oversleeve (or none at all), you may only need to add 3 or 4 inches to your arm length.
Step 2: sew gussets to sleeves
I made my underarm gussets out of two 7" squares that were cut in half diagonally to make four triangles. This was perfect for my purposes because it created plenty of room for movement, while still remaining quite close to the body. The original garment has 10" gussets, so feel free to use larger triangles if you are a larger size than I am, or just want a roomier chemise. The gussets are very important for getting a proper fit, so you may want to make a mock-up first to test out various sizes to see what is the most comfortable for you. On both sleeves, sew one triangle to each side at the top so that it looks like this. Press seams open or finish in a French seam.
 Step 3: sew sleeves to body
Sew the sleeves to the sides of the front body panel so the top edge of the front is 2" above the gusset seam. Next sew the sleeves to the back body panel so they the top edge of the back is 6" above the gusset seam. This creates a neckline that is higher in the back than the front, which I find to be more comfortable. At this point, your chemise should look like a big cross similar to the diagram on the right. Finish and press seams.
Step 4: sew up the sides
Fold the big cross in half so that it makes a "T" shape. Sew up each side from sleeve cuff to bottom edge. Finish and press.
Step 5: hem
Hem the bottom edge of the chemise. If you want open sleeves like mine, hem the bottom edge of the sleeves as well. If you prefer to put a cuff on the sleeves, leave the last few inches of the sleeve seam un-sewn and use one of the finishing techniques described below to gather and finish.
Step 6: finish the neckline
Version 1: a simple band Once you have run gathering stitches around the neck, put the chemise on and adjust the size of the neck so that it is as low or high as you want. Once you get it how you like it, tie off the gathering threads and measure the length around the neck (mine was about 40"). You can use some of your waste fabric to cut a 2" wide strip that is the length of your neck measurement plus an inch or two. If you are creating a squared neckline, the neck band can be on the straight-grain, but if you want a round neckline, you might prefer to cut it on the bias. Turn one edge of the band in about 1/4 of an inch along the entire length and press. Take the other edge of the band and pin it to the top edge of the neckline, right sides together. Sew band to neckline all the way around with a 1/4" seam allowance. Sew the two ends of the binding strip together where they meet, trim and press. Flip the band up and press. Next, turn the band over to the inside, encasing the raw edges, and whip-stitch the turned edge down to finish. Press. For a square neckline, miter the corners of the neckband where the sleeve pieces meet the body, and tack it down. To make this type of miter, I simply fold the binding in on itself and fiddle with it until makes an "L" shape. I know that is a horrible description, but it is pretty easy to figure out once you start messing with it.

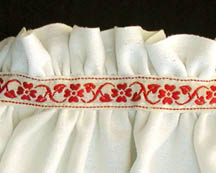
The version that I made simply gathered the fabric at the neckline and bound the raw edge with a simple band. You can gather the neckline with the sewing machine, or by hand. My chemise has hand gathering that was created by running 3 or 4 rows of parallel running stitches spaced with a stitch length of 1/8 inch. It is basically like cartridge pleating on a tiny scale. You can supposedly buy iron-on dots from smocking suppliers to help you keep your stitches even, but I just used a fabric marker to space mine. This whole process takes an obscenely long time to do, but when the threads are pulled tight to gather the fabric, it makes perfect tiny pleats that are held in place a bit below the edge of the band. If you are using this method, use a heavier weight of thread so that the running stitches do not break.
Version 2: a ruffle
If you would like a ruffle at the top instead of a band, you will need a long strip of material for the frill that is the same measurement as your un-gathered neckline plus and inch for finishing (136" on my version). If you are using the 60" wide linen, you will have enough waste from the selvage edges to make the ruffle without having to worry about finishing the top edge. With 45" wide fabric, you may have to piece more strips together and fold it in half lengthwise to make a finished top edge. When joining selvage strips together to get the proper length, you can use a French seam or flat-felled seam to make it nice and neat. You can also buy decorative trim to use for the ruffle instead of the plain fabric... maybe something with a scalloped edge or a bit of embroidery might look nice. Pin this strip to the neckline
wrong sides together and sew all the way around with a 1/4 inch seem allowance. Trim the edges down to 1/8" and press the seam open. Your raw edges will be on the outside of the garment, but you will use the trim to cover this up. Then run 2 rows of gathering stitches around the neckline on either side of the seam joining the ruffle to the neck. Space these gathering stitches slightly closer together than the width of your trim. Gather to the desired size and tie off the strings. Sew the trim over the raw edges and gathering stitches to finish. This method will work best with trim that is 3/4 of an inch wide or larger.
Version 2.1: an alternate version for the ruffle
This is another way to make a small ruffle that does not require a separate strip. Just make a small rolled hem all the way around the top edge of the neckline. Then run gathering stitches a little way in from the edge, however wide you want your ruffle to be. Gather the material, decide how big you want it, and then sew trim over the gathering to secure. This makes a less bulky band below the ruffle, and you can use narrower trim. However, you may need to raise your front body piece up a bit more than 2" from the gusset during the assembly stage so that you do not hit the corner of the underarm gusset when making your gathers.
There are a ton of other ways to make a ruffle or bind the neckline, but these are just a few suggestions to get you started. So that's it! I hope you enjoy your chemise!