Tuesday, October 27, 2015

Regency mourning


Although the "little white dress" of the Regency period might be the iconic gown that the era is best known for, black dresses during this period were also extremely popular and make equally great wardrobe builders.  This past summer, I decided to make a sheer black dress from around 1810 to wear as a mourning gown, and I've worn it to several events and have enjoyed dressing it up with a variety of accessories to get slightly different looks.

My dress is made of mystery-fiber fabric from the clearance bin of a local fabric store, and I think the whole dress ended up costing me around $10.  I sewed much of the dress on the machine, but because it is so sheer, all of the seams are carefully finished by hand on the inside.  To create the pattern for my dress, I used the very helpful diagrams and photos of a roller printed dress from the 19th US Regiment of Infantry Women's Dress page. I started out with double poof sleeves like you see in the original gown, but after wearing the dress that way a few times, I cut off the bottom poof because I thought the single puff was a little less fussy looking.  The dress closes in the back with a drawstring at the top and a single hook at the waist, and I wear it over over a white bodiced petticoat.
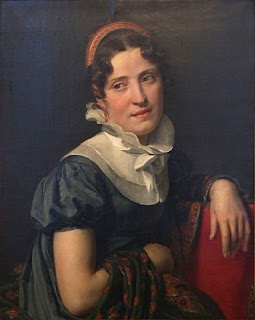

Madame Faber, 1816
The first time I wore this dress, I was attending a concert in a park, so I accessorized it with my black shawl, black boots, a black collet necklace and earrings, and a black Regency-style brass tiara/comb which was made by my amazingly talented friend, Megan of the Mistress of Disguise website.  I often think of tiara as a very formal thing, but when you look at Regency-era portraits, it is fairly common to see women wearing these tiara-like combs with daywear, so it's fun to be able to wear a pretty flashy accessory to a less formal event.


Princess Charlotte of Wales, 1816
On it's next wearing, I was attending a Regency ball, so I wanted to dress the outfit up some more.  I switched out the black jewelry for a rhinestone necklace, earrings, and tiara, and I also added a rhinestone clasp at the waistline under my bust. There are quite a few paintings of Regency ladies in black dresses with white satin slippers, so I picked up a pair of white Touch Ups ballet flats and added some silk ribbon ties to create a similar look.  To finish off the outfit, I wore a pair of long white vintage gloves, which really did a lot to make the outfit look more dressy.

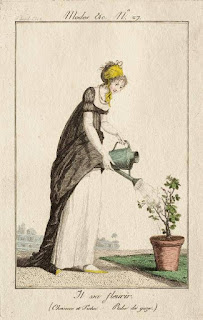
Modes et Manières du Jour no. 27

The next time I wore this dress was to the Breakfast with the Bennetts event at Costume College, so I wanted to go for a more casual "at home" look.  I took inspiration from this fashion plate from Modes et Manières du Jour and added a splash of color with a yellow silk turban and a yellow reticule.  I made the turban using a similar method to the tutorial I posted last year, and I also sewed some fake curls to the front edge of the hat so that it would be even easier to get dressed early in the morning.  I also decided to dye my beloved pair of American Duchess nankeen boots with yellow Rit dye, which was a bit scary, but I really like the results.


I also played around with wearing this dress with an antique black lace shawl, black gloves, and my black bonnet with a lace veil over it to create more of a full-mourning look.  I doubt I'll wear it like this to many outings because the veil and shawl are pretty delicate and are prone to getting snagged on things, but it was fun to at least take a nice picture or two.

I do have one additional way that I've worn this dress, but I'll save that for its own post since it is much less orthodox.  So, I'll just end this post with a few more pictures and a "to be continued..."


As usual, more pics can be found on Flickr.

Saturday, October 17, 2015

a hobbit at faire


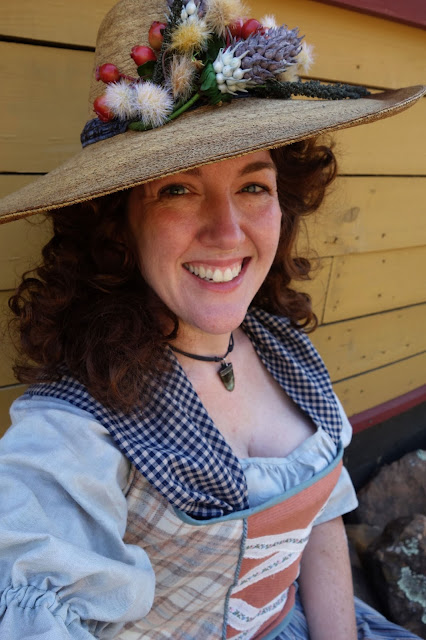
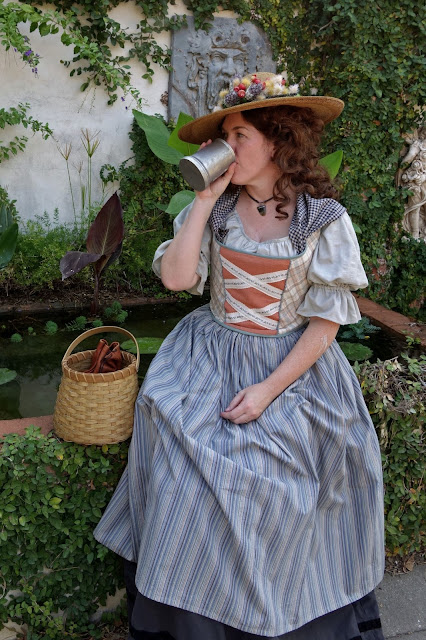
This year for our annual family trip to the Renaissance Faire, I decided to make myself a hobbit costume.  The theme for the weekend was Octoberfest, and since the female hobbit costumes from the Lord of the Rings trilogy are very dirndl-like, it seemed like a fitting choice.  I also have to confess that I've been daydreaming about a hobbit dress ever since Sarah from the Romantic History blog made her beautiful hobbit gown a few years ago.  Sarah makes hobbit fashion look SO GOOD!  Plus, with my love of home, food, and non-adventure, I've always identified with hobbits, so it was great fun to finally get to dress up like one!  

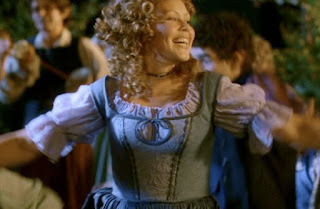
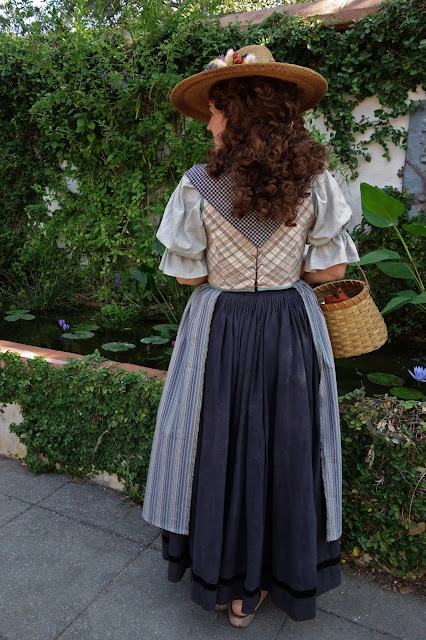
I started by looking through a bunch of screen caps from the movies and I modeled my dress after some of the styles that I spotted on various hobbit ladies.  My bodice is made of plaid wool cut on the bias, and the front panel is made from contrasting linen fabric with flowered ribbons criss-crossing across the front, similar to the lady on the right of this screenshot.  Like most of the LotR hobbit bodices, mine laces up the back, is bound around the edges with a contrasting fabric, and has decorative trim at the edges of the front panel.  I used my old 16th c. bodice pattern to make my bodice, and I decided to add a few strips of cable ties to the front panel to keep it smooth.  

Almost all of the hobbit ladies in the film are wearing short-sleeved blouses with a ruffle at the cuff.  Most of these blouses are a pale color instead of white, and some are embroidered or have a woven pattern.  My blouse is made of pale green cotton with a subtle woven stripe, and I used a 1980's peasant blouse pattern to construct it.  

My skirt was an older piece that I've had since I first started going to faires, but I dressed it up by adding an apron made out of striped blue and peach cotton. I also wore a gingham kerchief around my shoulders to add another layer to the mixed-matched look.  It was really fun combining so many colors and patterns in one outfit, and I think it gave my dress a fittingly rustic feel.     

Several of the hobbit women in the movie wear new-agey looking pendants on leather cords, so I picked out one of my husband's old stone necklaces to wear. I originally planned on picking out something more dainty to buy while I was the faire, but I liked getting a chance to wear this one, so in the end I decided not to switch.  

Hobbit hair is always curly, and most of the women have bangs or shorter layers on top.  I bought the Delihla wig by Mona Lisa for this costume, and think it worked perfectly for hobbit hair.  I was very pleased with the quality of this wig, and I got complements on my hair all day - I think I need to start wearing this wig all the time!  

I don't remember seeing any of the women in the first LotR movies wearing a hat (they do wear them in the Hobbit trilogy, but those hobbit costumes are more like 18th c. fashions), but I decided to add one for sun protection since it was going to be such a hot day.  I decorated a vintage straw hat that I found in an antique shop with a bit of trim and a cluster of flowers. I LOVE my hat! It's definitely my favorite part of this costume.  


And of course you can't be a hobbit without a pair of big hairy feet, so I ordered a pair of child-sized rubber hobbit feet and stitched them to a pair of my old leather clogs.  I got the idea from this tutorial for hobbit shoes, but I thought that the child-sized feet wouldn't be so big that I would trip over them all day.  After they were attached to my shoes, I repainted them with acrylic paint to make them look more realistic.  They were obviously fakes if you look close enough, but I left my skirt pretty long so that you would mostly just see the toes peeking out as I walked, and I was pretty happy with the effect.  


Here are a few more pictures from my day at faire, and you can see some additional shots on Flickr.  


Friday, September 18, 2015

mourning calico


So back in January, I shared a new natural form dress that I had made for a Little House on the Prairie group that was in the works for Costume College.  But then I had a change of heart and decided that I wanted a lighter weight cotton dress instead of a heavy wool one.   I also am a hopeless follower, and when I heard that my friends were making calico prairie dresses, I decided that I needed one too!  I found a great deal on a repro calico fabric from Saunders Fabrics, and I picked a black fabric with a simple diamond pattern, which I thought it would make a lovely half-mourning dress.  I'm so glad that I ended up switching plans because I think we made such a fun little group of Ingalls sisters in our nicely coordinating calicos.


For something a little different, I decided to try a yoked bodice, which was an incredibly popular style in the late 1870's.  In April of 1879, Peterson's Magazine features a plaid yoked house dress and stated that "the deep waist is made plaited back and front into a yoke; a belt around the waist, with a bow of ribbon on one side." Most of these yoked bodices had high, round necklines or small standing collars, but I found one example of a yoked bodice with a middy collar on a teenaged girl, so I thought that the V-neck might help keep me cool while I also try a style that I haven't done before.  

To help me get started with the construction, I found 2 yoked bodice patterns and several narrow overskirt diagrams in Fashions of the Gilded Age, Volume 1: Undergarments, Bodices, Skirts, Overskirts, Polonaises, and Day Dresses 1877-1882.  Although I changed these patterns up quite a bit to make my own dress, they were a huge help as I figured out the overall shapes.  

I used cotton velveteen for the collar, cuffs, and belt, and I edged it with natural linen rickrack, which really made these features stand out nicely.  The buttons are vintage and slightly mismatched, which is a fun little detail that seemed appropriate for a prairie dress.  I'm always amused when I see Victorian photos of women who have a mismatched button on their dress.  It happens more often than you would think, and I love imagining a practical frontier woman just replacing a missing button with something "close enough" and not wasting any time worrying about it.

I also wore a silk bow at my neck, and a mourning rosette at my waist. The rosette was a lovely gift from 2 friends, and I made a faux tintype of my husband to use for the portrait.  Similar mourning badges were quite popular after the death of Abraham Lincoln, and you can see a similar style here.  


As the finishing touch, I restyled a vintage black straw hat into a bonnet.  You can see the "before" version on the left.  I cut the brim off in the back of the hat and then wired the edge and covered it with petersham ribbon so that I could curve it around my face.  Then I stitched some wide vintage lace into the inside of the brim, and I trimmed the outside with some vintege ribbon and the original black feathers from the hat.  The ivory silk bow that was around the hat when I bought it was repurposed for the bow at the neck of my dress.

I love the long, loosely curled ponytails that you sometimes see in the late 1870's, so I took the easy way out of styling my hair and just attached a clip-in hairpiece and tied it with a bow. I think it's a nice change of pace from the more severe buns of the 1880s.


I only got a few posed pictures of my dress at Costume College, but I'm hoping to get some more fun ones in a pretty setting when I wear it again this winter.  But if you'd like to see a few more, you can check out my Flickr album.  

Sunday, September 6, 2015

A Summer Chemise


A friend of mine was hosting an 18th c. themed birthday party this weekend, and I decided at the last minute that I wanted a new dress that lightweight enough to be comfortable in our lingering summer heat. It's still in the high 90's here in Texas, so I thought a new chemise gown would be well worth a little detour from my other sewing and blogging plans. I also couldn't resist joining my friends, who were also wearing chemises to the party. I'm such a sucker for a theme!
 
The fabric is a figured cotton with woven stripes and dots, and it was originally brown.  I bleached it and then re-dyed it to be a periwinkle blue-grey color.  I thought the color that I ended up with was a nice match to the hue in this lovely fashion plate from Cabinet des Modes.  I originally wanted to make a ruffled neckline and hem to make my dress match this fashion plate even closer, but I only had around 4 yards of fabric to work with, so I didn't have enough left over for ruffles.  

Although colored chemise gowns during this time period are plentiful, it's hard to find much evidence for cotton chemise gowns in colors other than white.   Most of the surviving examples and period references show that colored chemises were typically made of silk.  But there is one fashion plate that shows a chemise of pink English muslin, and as far as I know, 18th c. muslin was always made of cotton instead of silk, so I'm hoping that little tidbit of evidence is good enough to let me get away with this somewhat unusual material.


I used the same basic pattern that I created for my black chemise a few years ago, but this time I made elbow length sleeves and only had 2 drawstrings on the bodice instead of 3.  Chemise gowns with fitted backs are very easy to construct, and I think they are a lot less fiddly than the kind that are gathered all the way around.  I took a picture while I was getting dressed to give you a peek at the construction.  It's really just a basic round gown with a gathered section attached over the front of the bodice, and this panel is stitched down on to the bodice at the sides and tied in the center with ribbons.

For the party last night, I just wore a simple ribbon and some flowers in my hair since this seems to be a very common look for ladies in portraits from the late 1780's and early 1790's.  But I also loved the way the dress looked with my black tall hat, so I took some photos of both styles while tromping though the woods at my local park today.  Here are a few of my favorite shots, and there are a few more pictures on flickr.


Saturday, August 15, 2015

1920 Bathing Suit


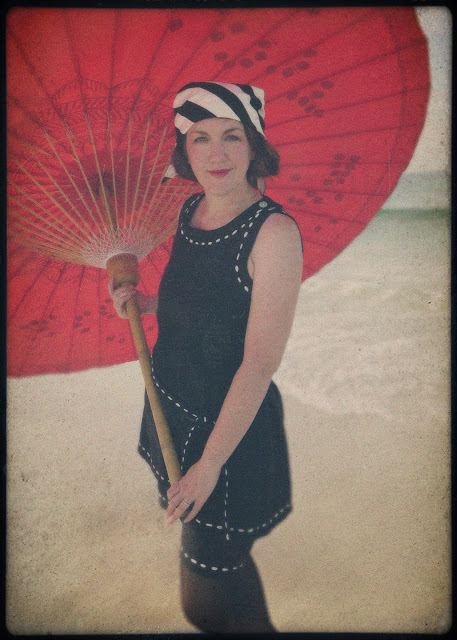
I’ve been madly sewing for Costume College over the past few months, and I finally have enough free time again to blog about my projects and show you all what I’ve been up to lately.  I’ll start by sharing the most summery of my new outfits – a late 1910’s/early 1920’s bathing suit.  I think these bathing suits tend to look pretty silly to our modern eyes, but they are comfy and fun and so easy to make, and I thought it would make a great low-stress costume to wear to the Costume College pool party after a long day of traveling.

bathing suits from 1918 New Idea Quarterly
My suit is not an exact copy of any one historical outfit, but the basic long tank top and boxy shorts were hugely popular in both photos and fashion plates of women (and men!) from the years around 1920.  You can see a wide variety of similar styles on my historical bathing suit Pinterest board.  Black was one of the most popular colors for bathing suits, and like most of the surviving examples, I made mine from wool.  I had a hard time finding wool knit for an affordable price, but I lucked upon some wool mommie cloth, which has a slightly stretchy crepe-like weave that worked perfectly for my project.  Then I decorated the edges with white rayon soutache.  I threaded the soutache onto a large eye tapestry needle, then sewed it directly into the fabric by using a big running stich around the edges.  The weave was loose enough that the soutache slipped through holes in the cloth with no trouble at all.  You can see a similar treatment on bathing suits like this one

I drafted my own pattern for this suit after consulting several 1920’s swimsuit pattern diagrams in the book Women's Wear of the 1920's: With Complete Patterns. I was very doubtful that the shorts pattern from that book would work for me - it’s just one rectangle for the front, one rectangle for the back, and a square gusset inserted into a slit for the inner legs and crotch - but it actually worked quite well.  Many of the 20’s bathing suits had the shorts attached to the top, but I made mine separate and used elastic at the waistline just to make it less fussy. Or if you wanted an even easier alternative, this type of suit would also be very easy to fake with a modern sleeveless blouse and shorts pattern.  


These early bathing suits are pretty plain on their own, so accessories go a long way to creating a more historical look.  The vast majority of women in 1910’s and 20’s photos of bathing suits are wearing some sort of cloth cap or bandana to cover their hair, so I just hemmed a large triangle of striped cotton to wear for my own beachy headwear.  

I also loved that so many of the women in the earlier photos were wearing black tights with their bathing suits, so I took some photos both with and without the tights, but I think I like the look of tights better just because it is more "old timey" looking. I was also curious to see how it felt to wear hosery on a beach or in water, but it was really pretty nice.  They offered protection from the itchy sand, and having wet tights next to my skin kept me much cooler than having the sun on my bare legs.  But it was also fun to take the tights off and get a more modern, later 20's look.  After having the tights on first, I have to admit that bare legs felt quite scandalous!  

For my beach shoes, I stitched some soutache around the edges of a pair of cheap ballet flats from Target and added some ties to wrap around my legs.  It was an easy alteration, and they held up well to wading through the water.  

But my favorite accessory of all was my parasol. The big one in my beach photos is made of canvas and bamboo, and it was sold at World Market a few years ago.  It is HUGE and heavy, but I loved how similar it looks to the beach umbrellas seen in some period photos, like this famous image by Jacque Henri Lartigue. I tried to take some similar photos, but it was harder than I thought it would be to look glamorous while running back and forth to take pictures with a tripod and automatic timer in the soft sand.  My umbrella kept rolling away and the waves would catch me off guard, so I'm sure I made quite a curious and memorable sight for the tourists watching me from their balconies at the condo!  


I obviously couldn't carry such a huge umbrella around Costume College, so I painted some swallowtails on a cheap paper parasol in a design similar to the parasol in this fashion plate.  It's not nearly as exciting as my big umbrella, but it definitely helped my outfit feel more complete.  The black and white is pretty severe without a little dash of color.  

So that's pretty much it for my first new Costume College costume.  I've uploaded all of my pictures from the weekend to this flickr album if you want to see some spoilers about what I'll be blogging about over the next month, and I also have another album with a few more of my beach pics. I also had fun indulging in my other hobby and turning some of my favorite shots into faux-autochromes and other antique photo fakes.  I think my favorite part about Edwardian and 1920s costuming is getting to Photoshop all the pictures when I'm done!  Autochromes are the best, and I always love getting new inspiration by looking at the real ones - aren't they gorgeous?