Monday, December 23, 2013

Historical Sew Fortnightly year-end recap


So 2013 was the year of Historical Sew Fortnightly projects for me, and I'm happy to say that I finished them all!  Hooray!  I was pretty lax about the due dates on several of the challenges, but I did manage to make something for all 27 themes, which was the main goal that I was interested in.  I have to admit that I stubbornly declined to do the "just the facts" list that was supposed to accompany each project - mainly because I hate counting hours and pennies, and I always feel uncomfortable making statements about my own authenticity.  Plus, the rest of the facts were always included in the narrative of my blog postings anyway.  But I thought I'd make up for it by writing my own set of "just the facts" questions to talk about my experience over the past year:

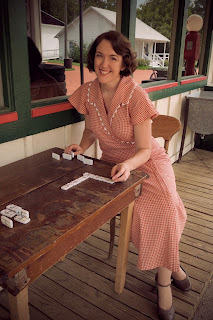
My 1930s Hooverette is a great example
of  a project that was completely inspired
by a specific HSF theme
Favorite things about the HSF:  I LOVED challenging myself with this project!  I thrive on goals and deadlines and puzzles, and the HSF was big and difficult enough to really make me want to push myself to finish them all.  Figuring out ways to fit my own lineup of projects into somebody else's parameters wasn't always easy, but it kept me constantly thinking and sent me off on a few fun tangents that I never would have explored otherwise.  It also kept me moving forward instead of taking long breaks between big projects.  Even if it was just something small, it was nice to always be working on and thinking about something new.  I also loved following along with everybody else's projects on the Facebook group.  I discovered a bunch of really amazing costumers and bloggers thanks to this project, and it has been so fun having a big batch of new costumes to look forward to every 2 weeks.

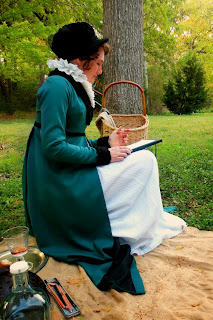
The green pelisse ended up being a
couple of weeks late for its challenge,
but it was definitely worth the wait
Least favorite things about the HSF:  Having deadlines that didn't line up with my events very well.  That part was tough, and it's also why I finally gave up on meeting all the deadlines exactly.  There were a couple of times during the year when HSF deadlines were adding to my stress level in a pretty huge way, so I finally had to accept that my sanity was more important that an arbitrary due date.  I completed a couple of challenges out of order so they would work better with the events that I needed costumes for, but for me, the fact that I finished each challenge was more important than when I finished them.  I also hated having to put most of my post-1938 projects on hold for a year.  It is going to be such a joy to finally be free of date restrictions so I can make more quick and easy 40's, 50's, and 60's frocks again in 2014!

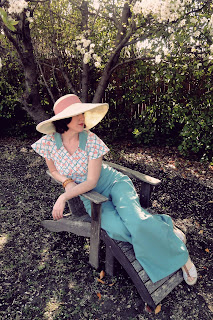
My 1930s beach pajamas ended up
becoming a favorite in both my
costume and modern wardrobes
Favorite challenge:  I looooved the "Peasants and Pioneers" challenge.  I loved the idea of making something less fancy, I loved the somewhat cheeky way that I bent the meaning of those words to work with 1930s fashions, and I LOVED the beach pajamas that I sewed for that challenge.  I ended up wearing that outfit to 3 different costume events this past year, and I never got bored with it.  The pants also became a staple in my modern wardrobe, and I plan on making a few more pairs from this pattern next year.  And best of all, I probably wouldn't have made those garments at all if it wasn't for the Historical Sew Fortnightly project, so I'm very grateful that this theme inspired me to make something different.

I love my natural form ball gown,
but it definitely didn't work well
for the HSF's 2 week deadlines  
Most challenging challenge:  The "Pretty Pretty Princess" challenge.  Making a "princess" worthy dress in two weeks?  Insanity!  Especially if you haven't had a chance to make all the appropriate undergarments first.  So this one ended up being a month late for me.  I probably could have given in and made an easy princess accessory just to meet the due date, but making an elaborate dress in such a short time frame is a bit nuts.

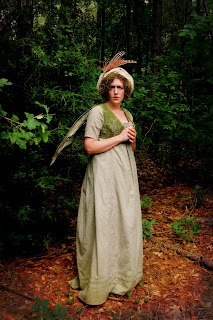
My "fairy from Lost Hope" literature
gown was very fitting for this year - I
definitely had my own "lost hope"
moments about the HSF project
Biggest success of the year:  Not giving up!

Biggest failure of the year:  My 1910's "separates" skirt only lasted long enough to take one picture, and then I ripped it back apart to remake at a later date.  I was burned out from Costume College projects and not in the mood to sew at all, and I didn't even really need that skirt for anything anyway. That was a real low point in the year for me, and the closest that I came to quitting.  But I'm stubborn above all other things, so I pushed on through and it got easier again after that.


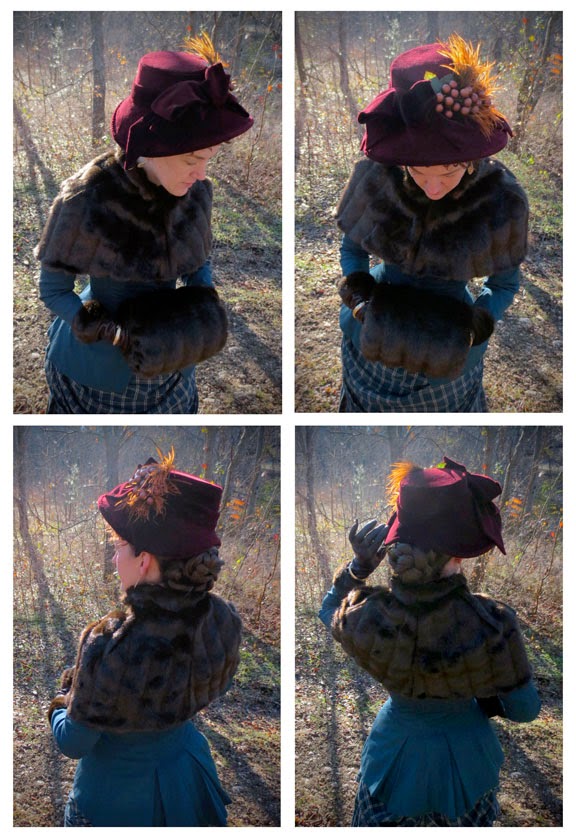
I had actually started a seaside bustle
dress for the "by the sea" challenge,
but when I ran short on time, my backup
pirate bodice came to the rescue
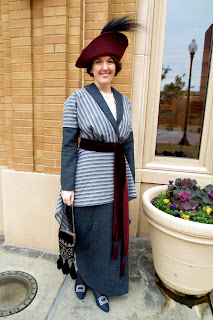
Best tips for people doing the challenge in 2014:  Try to plan ahead and break your big projects into smaller pieces.  Most of my full costumes from this past year had pieces spread out over multiple challenges.  For example, my pirate costume used the skirt for "UFO", the hat for "embellish", and the bodice for "by the sea".  And all of these challenges were spread out over a few months, so that really gave me a lot of time to work.  My other tip is to remain flexible.  Some of my friends like to tease me about how often I change my mind when planning projects, but this actually turned out to be a real benefit with the HSF.  Things happen, time runs short, projects bomb... but if you always have a Plan B (and C and D) in the back of your mind, you can more easily switch gears and work around the difficult patches.

My 1913 dress was one example of a project
made completely from stash materials 
Stats from this year:  Thanks to this project I made 7 hats, 5 full dresses, 5 pieces of outerwear, 4 skirt supports, 3 corsets/stays, 3 pair of pants, 2 skirts, 2 bodices, 2 shirts, 2 waistcoats, and 5 misc. accessories that don't really fit anywhere else.  Out of those 40 garments, I ended up with 8 complete outfits, 2 sets of accessories to remodel old outfits, and a few odds and ends to be used with future projects.  And since I also had made a stash-only goal for myself this year, I managed to make 32 of the 40 garments completely from materials in my stash, and 4 more were made with a combination of new and stash materials.  The only garments that were completely new to me this year were the 4 long regency shawls that I just seamed together.  I count that as a definite stash-busting victory!

The Historical Sew Fortnightly has been such an incredibly rewarding project for me.  When I started the year, I never thought that I'd have the time or the stamina to finish all 27 challenges, so completing the full year is something that I'm very proud of.   This project really pushed me to manage my time better, think creatively to solve problems, and not be afraid of ambitious sewing goals.  So I want to give a huge thank-you to Leimomi for all of her hard work organizing the Historical Sew Fortnightly this year, and also to the online costuming community for all of your inspiration and support as you played along or cheered from the sidelines.  It's been a really fun year, and if you missed out on the project in 2013, she is doing it again for 2014.  Although I plan on taking next year off, I can't wait to see what wonderful HSF projects you all make next!


Sunday, December 22, 2013

faux-Victorian photos


After taking all these pictures of my new winter accessories, I decided to indulge in my other favorite creative pastime - making faux-antique photos.  In the real world, I teach a photography and Photoshop class, so I really enjoy playing around with photo manipulation.  I'd love to experiment with some actual historical photography techniques someday, but until I get crazy brave enough to invest in all of those chemicals and equipment, my Photoshop fakes will have to do.

 
Tintypes are my favorite type of antique photo.  I love how dark and moody they are, with their oh-so-hip grungy borders, dings, and scratches.  It was really fun to combine the tintype look with outdoor photography.  I think it makes the world seem quite dreamlike and surreal.  

And just for something different, I also tried out a more formal-looking cabinet card too, which you can see below.  All of these were made by combining my modern digital photos with scans of real tintypes, cabinet cards, and old paper.  


Thanks for letting me share a few of my faux-Victorian selfies with you all!  

Friday, December 20, 2013

1883 winter accessories


So what's a girl to do when there's a Victorian holiday event coming up, but you only have a boring old dress to wear and no time to make a new one?  Why, you whip up a few new accessories, of course!  I already had a fabulous fur muff that I made for the Historical Sew Fortnightly "re-do" assignment, so I decided to make a matching fur cape, cuffs, and winter bonnet for the HSF "celebrate" challenge.  I couldn't be happier with my festive new accessories, and it really made my old dress feel new and fun again for the holidays.
Winters in Texas are never very cold, but I knew it was going to be in the low 40's on the night of our event, so I needed something to help keep me warm.  I decided that a capelet would be the easiest option to make in a short amount of time, and I've always loved the little fur capes from the early 1880's that tightly hug the shoulders, such as this beauty that I stumbled across on a fabulous blog known as The Cabinet Card Gallery.  Luckily, I had just enough faux fur left over to make this style of cape, so I was really pleased that my last few scraps could be put to a good use.

The pattern for my cape came from the accessories section of Fashions of the Gilded Age, Vol. 2.  I tried out several of the cape patterns in that book, but I finally picked the "cashmere and satin hood" because it had such a great shape and it made up easily.  I enlarged the cape part of the pattern by 110% since the original was really small across my shoulders, and I rounded off the bottom edge to be smooth vs. notched.  Instead of including the hood, I added a simple rectangular standing collar.  The cape is lined with a silky brocade, and I used 3 coat hooks to close it in front.

I also made up a set of fur cuffs to add to my jacket sleeves, similar to the look that you see in this fashion plate of a woman with a matching cape and cuffs (and the worlds smallest muff!  OMG - what happened to her hands!?!?)  The cuffs are detachable and just basted onto the jacket so I can take them back off when I want to wear it in the summer.  I also bought a new pair of leather gloves and wore a pair of gold bangles over them, which seemed to be a popular fashion... although somewhat inconvenient if you need to take your gloves off and on frequently to check your cell phone.


I also wanted a more wintery hat to wear with my outfit since the only bonnet that I have from this period is straw and more appropriate for summer.  Unfortunately, I didn't have a bonnet pattern on hand, and I was too short on time to order one, so I used my Lynn McMasters seaside bonnet pattern to get me started.  I cut down the width of the brim and drafted a new crown to make the shape more appropriate for the late natural form years.   It isn't meant to be an exact copy of any one bonnet, but you can find a wide variety hats in a similar style in my 1883 Peterson's magazine, such as the ones on the left.   
I used a remnant of maroon cotton velvet to cover the bonnet, and it has a gathered lining of terra cotta colored silk.  The hat is entirely hand-sewn, and everything except the $.50 sprig of berries came from my stash.   It is a bit hard to see the shape once all the frippery is on it, so here's a picture of the base before it was decorated.  Below, you can see the finished version from various angles.  
I didn't get very many good pictures of me from the Candlelight event, but I decided to dress up again for a morning stroll through the woods so I could take some more pictures just for fun.  Here are a few of my favorites (and more on flickr), and I'll be back soon for one little photoshoot postscript.  I also want to write up a year-end recap of my experience with the Historical Sew Fortnightly project.  Now that I survived a year's worth of challenges, it's time to celebrate!


Monday, December 9, 2013

knickerbockers


The project that I made for the Historical Sew Fortnightly "one meter" challenge is a pair of 1910's knickerbockers for my son.  I only needed 3/4 of a yard of wide wale corduroy from my stash to construct them, and I was happy to have an excuse to try out another one of my Edwardian patterns.  As usual, it was both a delight to get to work with a pattern that is around 100 years old, but also a source of much befuddlement trying to figure out how to put them together!


I started these last month and intended to use them for the previous HSF challenge, but I ended up having to make them three times before I got it right so they got bumped back a little.  The first time they were clownishly big, even though the size should have been perfect for him.  Next I tried a different Edwardian pattern for knickerbockers that also should have fit him, but they were a little too tight and way too short.  So then I switched back to the first pattern, but I removed about 4 inches of width while keeping the length the same.  So I guess issues with too much ease isn't just a modern problem!

The pattern has "instructions" - and yes, Edwardian instructions definitely deserve air quotes around them! - for a version with a fly and a version with side buttons.  I tried the fly first, but I had no clue what I was doing and it looked pretty wonky, so I switched back to the side opening, but this caused even more confusion when I tried to insert the pockets.  They didn't bother to include a pattern piece for the pocket, and here are all the instructions that were included:

Seems easy enough, but I had no clue what to do with the top of the pocket since it needed to be left open somehow to make the side closure work.  It was probably totally obvious to Edwardian seamstresses, but I'm pretty sure I did it in the most convoluted way humanly possible.  I finally ended up with something wearable in the end, so I guess that's all that matters.

Ironically, the event that I made these for was canceled due to a nasty ice-storm, so I'm not sure if he'll have a chance to wear them before he grows and changes size again.   But it was still fun to try the pattern if nothing else, and hopefully it'll go much more smoothly if he ever needs knickers again in the future.


Monday, December 2, 2013

faux fur muff


This week's Historical Sew Fortnightly challenge was "re-do", and although I started a different project for this challenge last week, it sort of crashed and burned at the last minute.  So I quickly switched over and made the easiest thing that I could think of - a faux fur muff with an interchangeable cover.  This one would qualify for several of the HSF challenges, such as "flora and fauna", "accessorize", "squares, rectangles, and triangles", "gratitude", or "outerwear", but I think the theme that is the most appropriate in this situation was the very first challenge - "starting simple"!  The entire project took less than two hours to finish, and now I'm wondering why I didn't make one of these things years ago.

I used the fabulous instructions from The Fashionable Past to make the muff base, and I plan on using this with both 18th century and Victorian costumes since it is a pretty generic size and shape.   My base is made of a scrap of navy cotton twill from my stash and stuffed with polyfill.  It doesn't look like much on it's own, but it is amazing how much rounds out when the cover is on it.  
I added a little patch pocket to the inside that is just big enough to hold my iphone or camera, and I put a strip of velcro at the top of the pocket to hold it closed.  I'm sure I could have come up with a fancier arrangement for the pocket, but this seems to do the trick well enough.  
The cover is just a bit of left-over faux fur from another project that I made years ago.  Again, I used Katherine's instructions in pt. 2 of the muff tutorial to finish it up.  The only thing that I did different was to stitch a cord to the cover so I could carry it by a handle if I didn't want to wear it on my hands.  This is something that I've seen in a lot of antique fur muffs, and if I don't need the cord handle, I can easily tuck it back inside of the cover.  


I've seen lots of great muffs in Victorian fashion plates that have bows or cords or tassels hanging from them, and I will probably go back and add more frippery to this muff eventually - maybe like this one from 1890 featured in Peterson's Magazine.  But this is good enough for now, and I'm just grateful to have a project done for the deadline.  :)